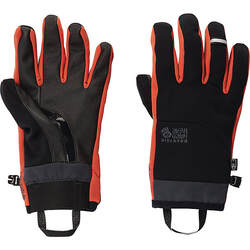
I don’t necessarily need gloves that are entirely waterproof (hard to retain long-term waterproofing on complex finger seams) but I wanted something made of a fabric that I wouldn’t have to ring out. So I started shopping around for a solution and noticed that Mountain Hardware has got a good selection of gloves that seems to fit the bill but also seem tough enough to grab onto tree branches and rocks and not fall apart or having their breathability compromised in less than a year (in my opinion, gloves, like boots, are a short term investment—but I hike a lot). Touchscreen enabled fingers would also be nice. These days, there’s a lot of marketing mumbo-jumbo associated with gear branding that I don’t tend to put a lot of stock in (like attorneys and psychic mediums, marketing professionals are experts at baffling people with bullshit)—so I like to read between the lines to get a better sense of what I’m going to spend my money on. The gloves I settled on, the Rotor™ Gore-Tex Infinium™ Glove, were advertised as breathable, windproof, light but tough (built for rock climbing)--but the details were gobbed up with with marketing salad (Gore Tex Infinium, Prima Loft Gold, Rotor, 3L Windstopper—each followed with a little “TM” like boxcars after the engine). I did some research. I still have no idea what a “Rotor” is supposed to do for me. The Primaloft is pretty straightforward—it's insulation--in this case a pretty thin layer of it. The Windstoppper obviously is supposed to stop wind, but the Gore Text isn’t the kind of waterproof-breathable fabric Gore Tex is known for—it is Gore Tex’s “Infinium” fabric line, a high-tech windproof fabric. Having hiked halfway through the winter with them at this point, the gloves have earned my respect—in fact I’d say they are probably the best lightweight glove I’ve ever owned. Here’s why:
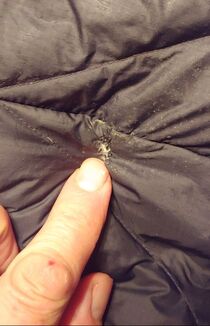
 The glove turned inside out and showing fleece strips along fingers and side seams, with micro-fleece insulation with air trapping pockets on the majority of the lining.
--Paul-William
0 Comments
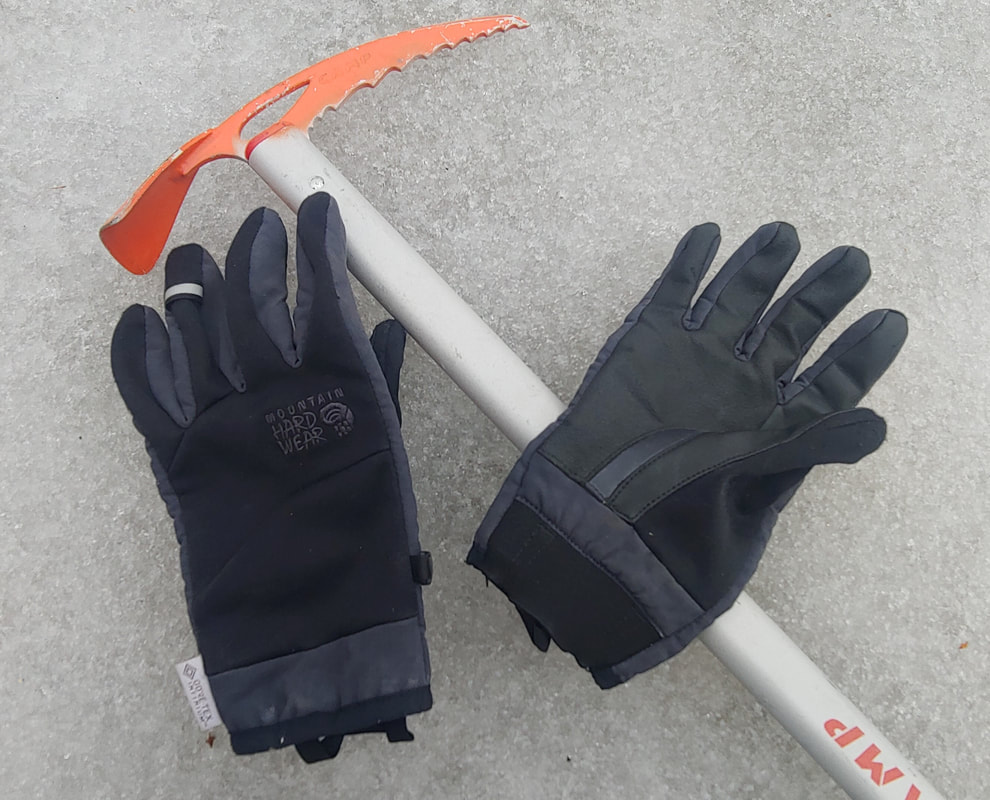
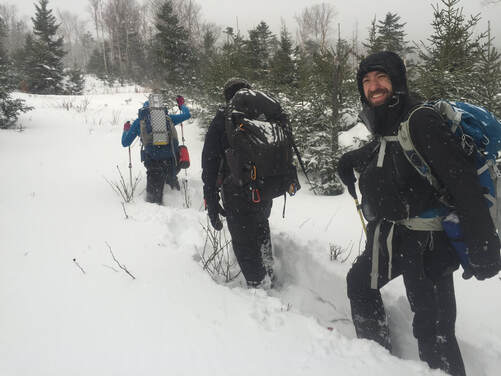
 Although it isn't officially winter until December 21 (winter solstice), the weather gods don't care--they'll gleefully dump snow and freezing temperatures on us any day now (and have already got started in the mountains). Being prepared for safe winter hiking in the mountains of the northeast United States means having winter-worthy gear and a matching attitude. If you're contemplating winter hiking in the mountains for the first time in your life, unless you're a witless person you're probably at least a little anxious about preparation. But even experience doesn't always translate into preparedness: there's a little corner of hell reserved for us old timers called complacency. Whether new and anxious or old and careless, I hope you'll find this bulleted list helpful in your prep for the snow, ice and negative digits. Gear inventory and prep:
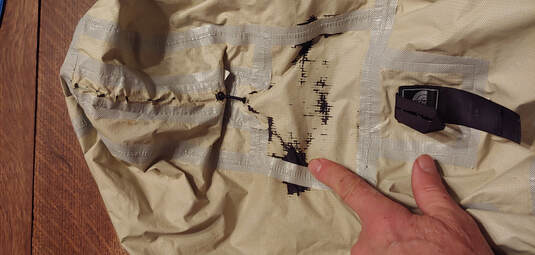 The waterproof/breathable layer has delaminated on the hood of this Marmot shell jacket, making it unreliable.
 No bueno: broken chain link and dull points on these Microspikes.
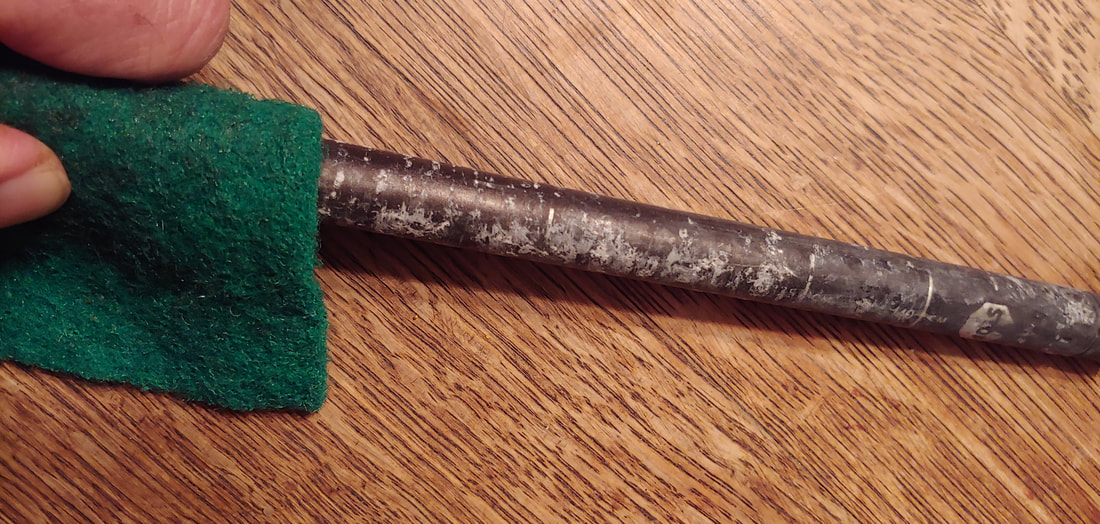 Removing chemical oxidization from this collapsible ski pole. with a plastic scrubbie.
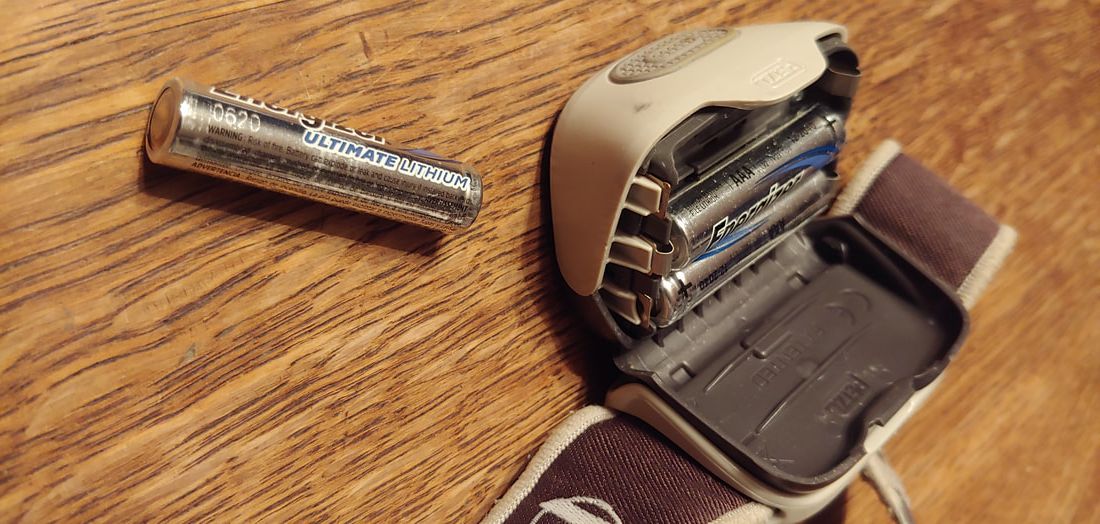 Replace old headlamp batteries with new lithium batteries (which hold up better in cold temperatures).
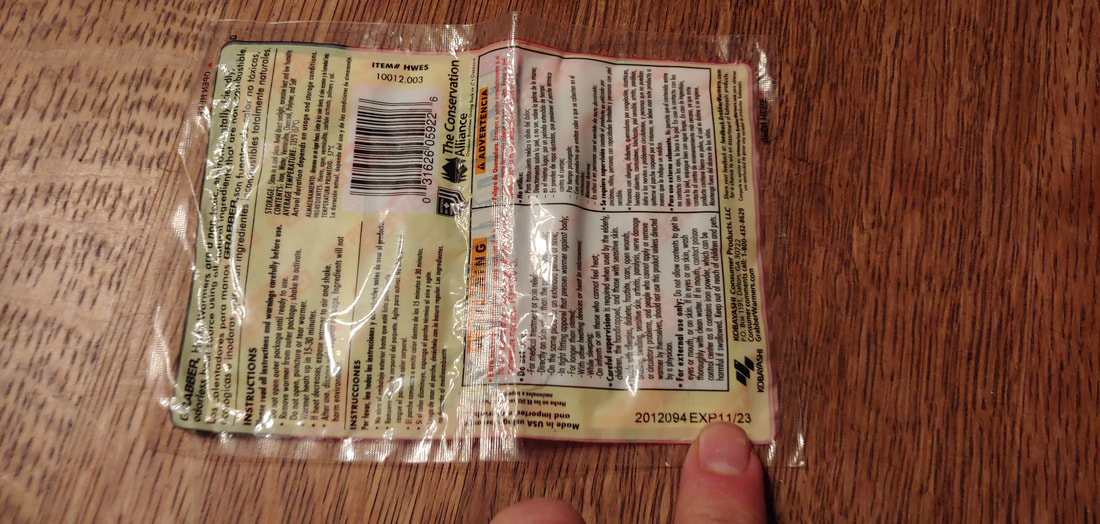 Although these warmers will expire next year, I check them by feeling them through the plastic wrapper: if they feel grainy, they're no longer good.
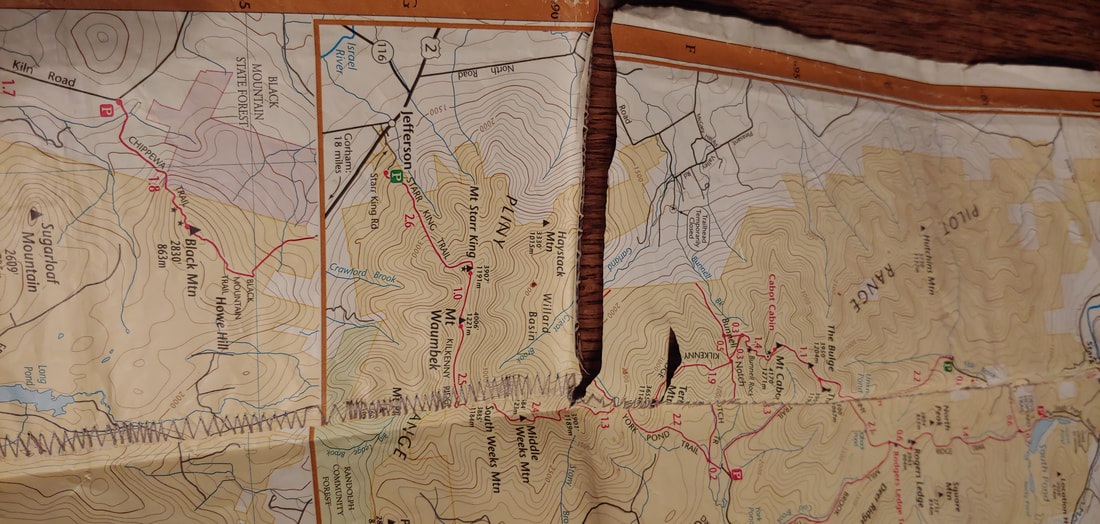 Cheapskate that I am, when this synthetic map started to rip a the seams, I sewed it back together with my sewing machine. But maybe it's time to replace it?
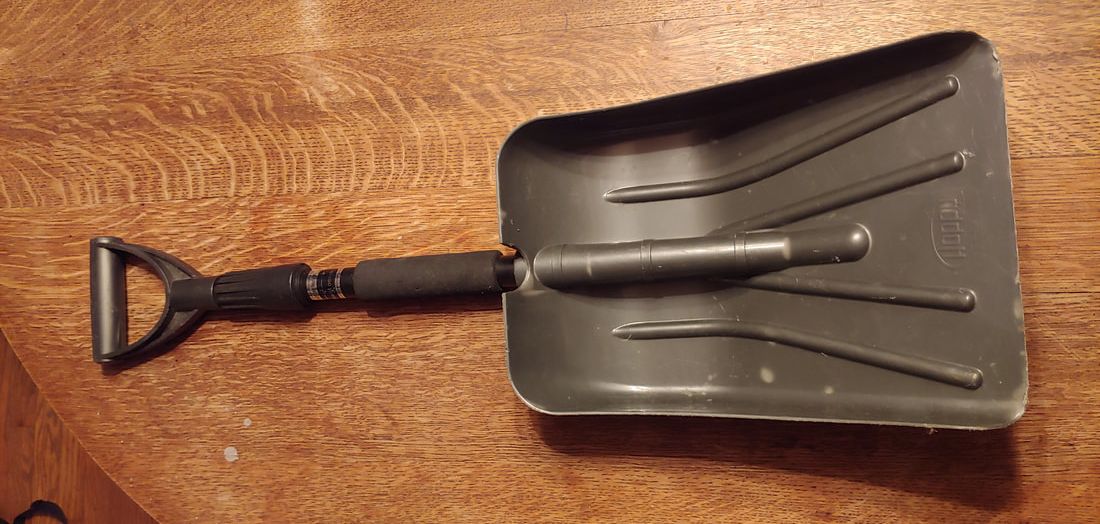 I keep this folding shovel in my car just in case I get snowed in at a trailhead. Mental and physical preparedness:
 A lot of preparation went into planning the non-traditional route for this successful 2016 hike up East Kennebago during a blizzard.
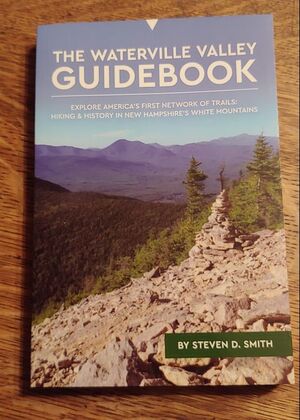
of a peakbagger's bible: The 4000-Footers of White Mountains. Well, Steve has a new book out (as of 2020), this one a treatise on all the trails, mountains, and historic features of the Waterville Valley region of the White Mountains: The Waterville Valley Guidebook (332 pages/ $25). Like The 4,000-Footers, the book is meticulously researched, with tidbits about the history of the area and its hiking and ski trails, local nomenclature, settlement, geology, ecology and all sorts of other fun facts (the scope of the book includes everything from village paths to rugged trails on the nearby high peaks of Osceola, Tecumseh, and the Tripyramids). Unlike The 4,000-Footers, The Waterville Valley Guidebook is loaded with color glossy photographs, some of them current, some some historic. The tone of the book is objective and informative but accessible and laid back. Both an incredibly detailed and entertaining hiking guidebook and a handsome coffee table book, it's the kind of book you'll want to pick up and read just for fun on a rainy day or consult briefly before setting out for an adventure on a sunny day. --Paul-William
Misunderstandings about how smartphone GPS and hiking map apps work and the risk involved in relying on them aren’t just the province of fools and newbie hikers—a lot of older, experienced hikers tend to whet the edge of their criticism of GPS apps and app users on their own unfamiliarity with How Things Work, and from the perspective of younger folks born into info-tech, their attitude toward it rings a bit too much like typical stone-age boomer contempt. Given how rapidly smartphone GIS tech has advanced in a short period of time, keeping up with it all a challenge. So, let’s break it down, shall we? Maybe the best place to start is at the beginning. . . in the true Stone Age.
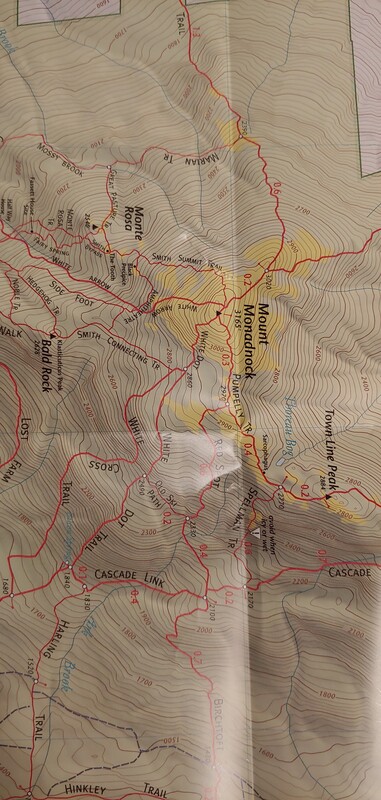
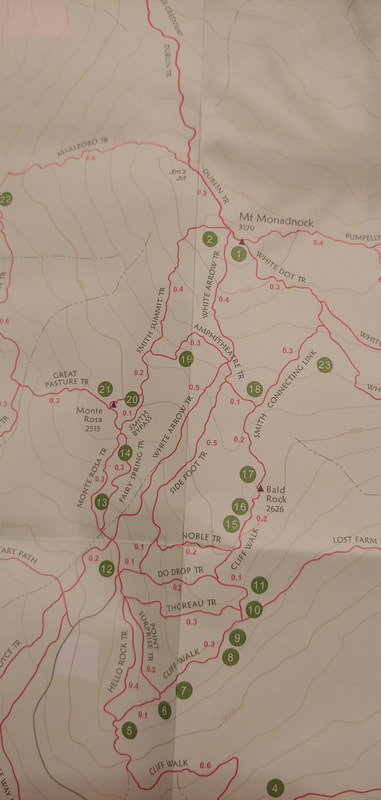
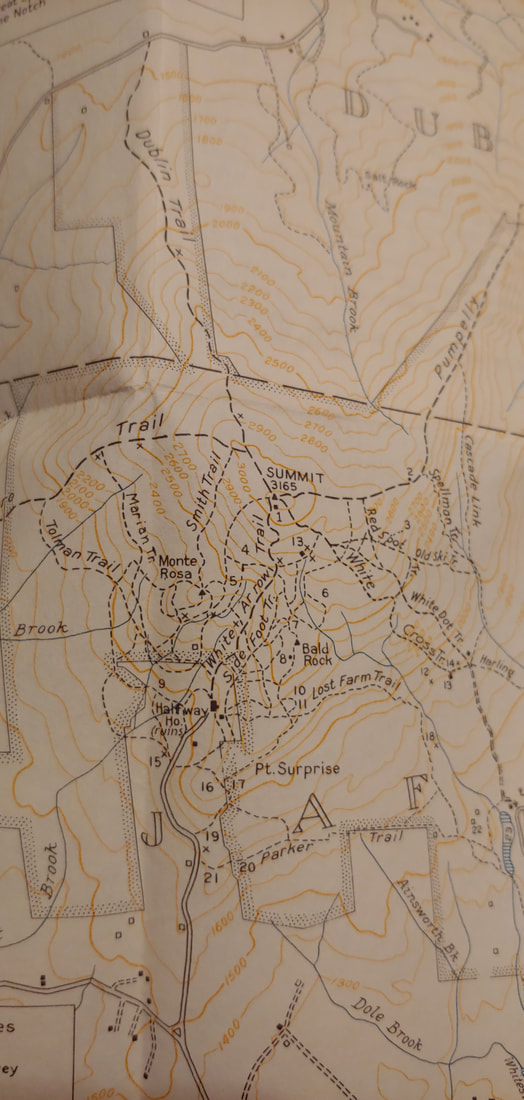
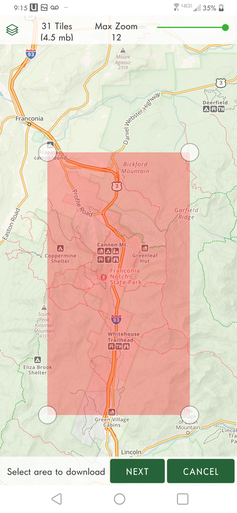
Maps that rely on memory alone are inherently unreliable as a community resource because navigation through memory relies heavily on the abstract and relative importance of certain landscape cues instead of on actual geometry and scale. When a cognitive map is translated onto paper, distance and proportion are (more or less) distorted (this is a well-researched phenomenon, and you can try it at home for fun: without any reference materials, draw yourself a map of your neighborhood or town. Then go back and compare it to a street map). To make maps useful to more than just one person, humanity's cartographic toolkit had to evolve. That began with the discovery of the concepts of geometry and trigonometry (~200 BCE) which informed the practices of measurement and triangulation, while inventions like the compass (200 BCE), telescopic sight (1600s), and theodolite (1700s) made use of it. Older maps were constantly being copied and improved upon, and systems of measurement became more consistent. Global trade and exploration also helped hone accuracy, distribute map-making technology and knowledge, and promote the paper map as a common concept, but it wasn’t until the modern era (late 1700s) that topographic maps showing contour lines were invented. 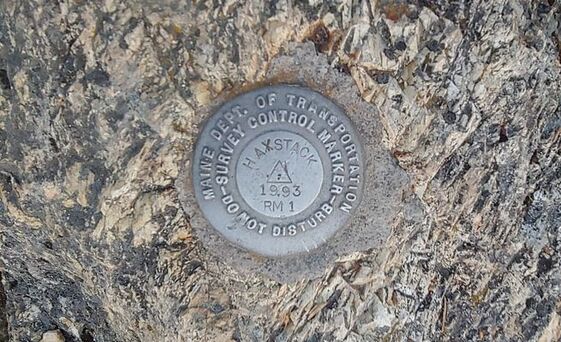 A Maine DOT survey control marker on Haystack Mountain in Aroostook County, ME Early topo maps were created by physically surveying extensive areas of land. Surveyors laboriously carted their instruments into the countryside, across rivers and over mountaintops, where they set up stations and triangulated between them to generate models of topography, which were then rendered on paper maps using the innovative method of drawing thin lines to represent intervals of elevation change (contour lines). These old-time surveyors make today’s hikers look like wimps; they made their way across the howling wilderness of the Adirondacks and White Mountains without the benefit of trail systems or modern hiking gear. Evidence of topographic surveying work can be found in those little bronze disks set into many of the rocky summits of the northeast. By the mid-1900s the practice of physical surveying was improved upon through the use of aircraft and satellites to remotely gather digital data which could then be modeled to show elevation intervals or relief through shading. Initially this was done through photogrammetry: the 3-D triangulation of images derived from two or more cameras facing the same geography from different angles, and most recently via lidar—special depth-sensitive laser systems mounted on aircraft. 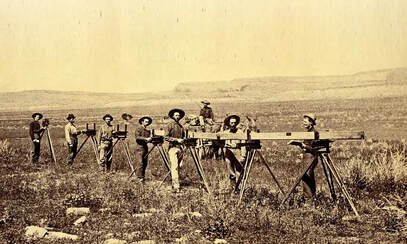 Surveyors carrying equipment in 1880s New Mexico (photo: Library of Congress) Creating maps from data is different than the process of creating maps from physical surveys. Digital geographic data sets can be rendered and manipulated very quickly and easily into novel, customized (and even interactive) maps through computer technology (including the tiny computers that most of us now carry around in our phones). THERE IS NO SPOON. . . At the end of the movie The Matrix, the protagonist Neo achieves an elevated state of consciousness that allows him to see the data code that underlies the virtual world in which he exists. Stubbing one’s toe in the Matrix isn’t the fault of the virtual wall that one stubs the virtual toe on, it’s the fault of the data from which the wall and the toe are derived. Likewise, it’s wise (red pill view) to think of the map you see displayed on your device as a vehicle for experiencing geospatial data, rather than as the product of the application itself (blue pill view). For the most part, geospatial data isn’t derived directly from the phone app or its developers—it’s a rendering of geospatial data collected, assembled, and curated elsewhere. Geospatial data comes in two main flavors: vector data and raster data. In a nutshell, vector data are individual geographic locations to which identifying information is assigned, and raster data are geographically referenced digital images. 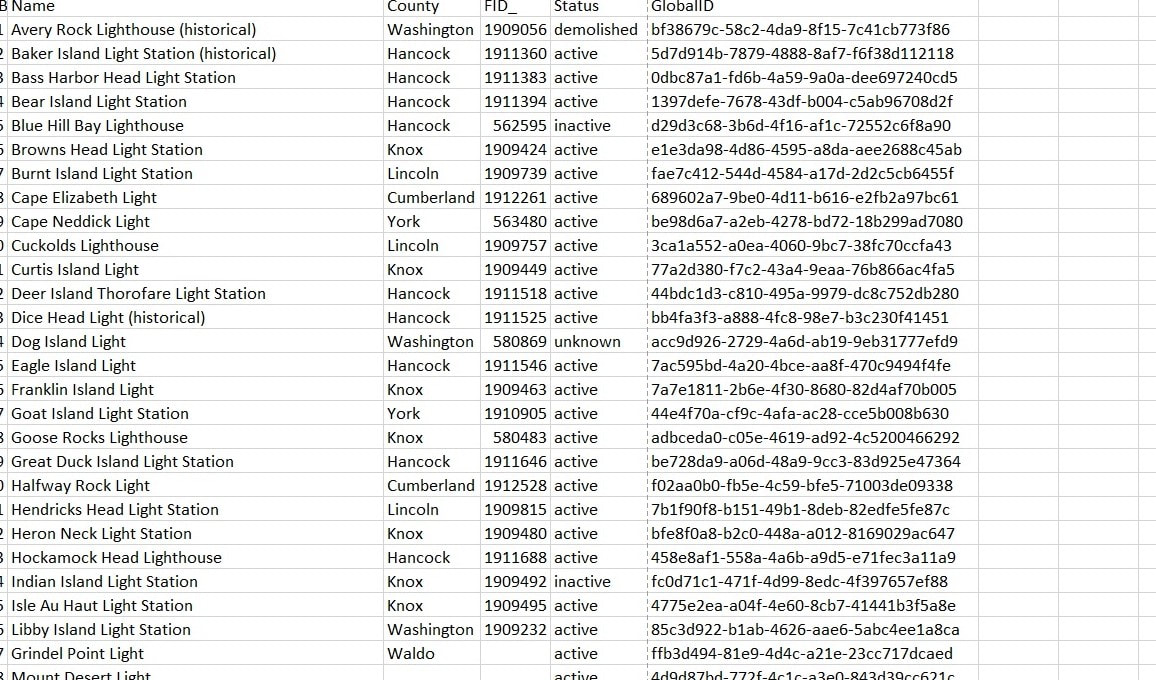 Visual of vector data set of Maine lighthouses (point data). Vector data, composed of points, lines and polygons, is the basis of a good many elements in modern hiking maps, both GPS-app and paper maps. Points consists of single points (such as a mountain summit or a street address) assigned a latitude, longitude, elevation and other identifying characteristics (such as the name of the mountain or street name and number). Lines (rivers, roads, trails, etc.) are simply a series of directionally- connected points, and polygons (town boundaries, lakes, state park areas, etc.) are closed lines. Because each piece of vector data is discrete and individual but also sortable, vector data is very easy to customize in maps. For instance, a vector line showing the course of the Mississippi River can be rendered by script or map-making software in any color and any width, with or without border edges, etc., making it possible to show the river meaningfully in maps of any scale (this is called symbolization—we’ll get back to that later). Vector data is also relatively easy to create: when you track your hike on a GPS device or place a pin to mark your location, you’re creating simple vector data. Vector data can be stored and shared via databases, scripts (such as XML based scripts like .KML, .GPX. and OSM's .OSM), or even punctuation-delineated plain text. 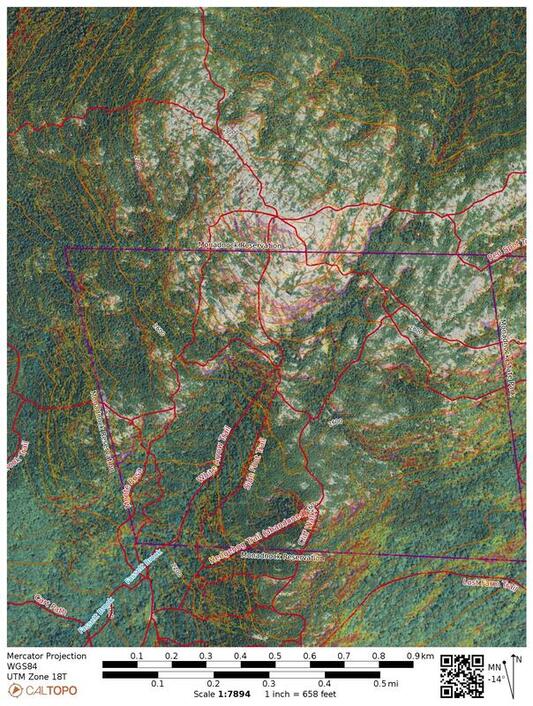 A NAIP aerial image (raster) of Monadnock with vector and raster overlays (OSM trails and public lands; contour lines, and raster-derived slope angle shading) Raster data is essentially a digital image that is geo-referenced to the latitude and longitude of the earth it is supposed to represent. Like all digital images, raster data is composed of pixels; each pixel in the image is assigned, through a matrix, geographic coordinates. Examples of raster data include aerial and satellite imagery, lidar data, vegetation cover maps (derived by analyzing color and contrast patterns in remote imagery), wildfire activity maps (infrared imagery rendered into visible-color heat-map images), etc. Any digital image can be georeferenced into a raster, regardless if it has geographic meaning or not: one can geo-reference a historic 1930s-era paper USGS topographic map (meaningful but out of date) or stretch a photograph of the face of actor Matthew McConaughey across the state of Texas (meaningless—maybe?). It is hard, with raster data, to manipulate discrete elements of geography in the image because (for instance) aerial photo pixels don’t care if they’re pixels of state highways, federal highways, or basketball courts—they’re all going to have the same asphalt-gray color in an image. Raster data are manipulated in the same way that we manipulate digital photographs—by making systemic changes based on contrast, color, brightness, depth, etc. The utility in that kind of systemic manipulation is in how it can make certain geographic patterns really stand out that wouldn’t otherwise be apparent to the naked eye. Raster data is typically stored in image format, either within a data package containing reference scripts that draw on sections of the imagery as it is needed, or within a database matrix, or as stand-alone georeferenced images or documents (GeoTiff and GeoPDF, etc.). MORE DATA THAN YOU CAN SHAKE A STICK AT The amount of geospatial data available today is staggering, and it originates from a wide variety of sources: governments, corporations, non-profits, and individuals (through crowdsourcing and social media sharing). For instance, much of our elevation data in the United States comes from the Department of Interior's United States Geological Survey, which gathers data via remote sensing (satellites, planes fitted with photographic equipment or lidar). Likewise, the United States Department of Transportation (USDOT) creates and manages data on the country’s primary highway systems and railroads, while states and municipalities create and curate GIS data showing minor roads, sewer systems, sidewalks, utility lines, state parks, etc. FEMA has datasets on flooding and flood zones. The CDC has data sets showing the locations of disease outbreaks. The National Park Service manages data on trails and points of interest in National Parks; the Forest Service does the same for their lands. Branches of governments of other countries have comparable data departments. Most government data (excluding military/intelligence agency stuff) are routinely made available free to anyone who wants to use it: individuals, municipalities, companies, non-profits, and public-service data clearinghouses alike. Many states support data clearinghouses that collect, vet, manage, and distribute GIS data and metadata; data.gov is the clearinghouse for data created by branches of the United States federal government. These data repositories often include interactive online GIS (not GPS) mapping that allows you to view and overlay the various available data. Data created by private companies (like Google for instance, or cell service providers who track the location of users and turn that data into a commodity) may or may not share their data sets, or restrict how it is used if they do share it. Data from non-profit organizations (The Nature Conservancy maintains huge geographic datasets on ecological resilience to climate change for instance) is often made available free of charge, and there is quite a body of it. "Crowdsource" data is generated by individuals who create and share data (usually for free) through apps or data clearinghouses (trail routes generated by users of AllTrails.com are crowdsource data). Crowdsourcing relies on the advantages of local knowledge; the accuracy of crowdsource data tends to increase in proportion to participation. When maps are made or there is a need to analyze geospatial data, these individual data sets are collected from their sources. Both Google and Open Street Map (OSM) make high use of publicly-available geospatial data. OSM—the free, non-propriety, and international alternative to Google—maintains vector and raster data sets assimilated from vetted public data sources (like USGS and USDOT) along with substantial crowdsourcing data (data created and/or curated by individual contributors at the local level) and feedback from professional sources ("prosourcing") that use OSM in their applications (Mapbox-- a company that specializes in creating GPS application development tools-- relies on OSM data, uses its applications to improve the OSM data, and then feeds the improved data back into OSM). 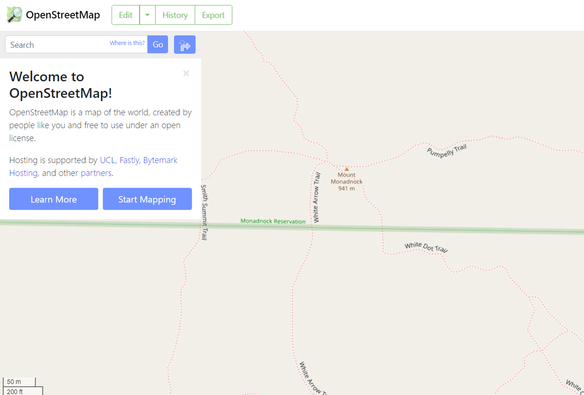 The OSM crowdsource mapping interface But the accuracy of geospatial data is only as good as the accuracy of data collection and the effort put into keeping it current. If, for instance, a city re-routes a road intersection but doesn’t immediately provide a data update, there will be a lag in accuracy which will in turn probably be reflected in Google Maps and OSM, whose data banks various smartphone apps rely on to create their maps. That inaccuracy may in turn be corrected sooner than the municipality can respond in the case of Google (who is drawing on the data stream of vehicle drivers using Google Maps applications) or OSM (where a prosource or crowdsource user notices the change and updates the data)—or the lag may persist longer. I’ve seen some intersection errors persist for several years in Google maps! Gallery: Two modern Monadnock maps (left, center) digitally derived from the same vector data but symbolized differently. The third map is a 1960 AMC map manually derived from an earlier USGS series print topographic map. DOES YOUR APP LOVE YOU, AND DO YOU LOVE YOUR APP? Many non-Google GPS apps that are available for smartphones rely heavily on free vector data compiled by OSM and other open public sources. Someone must decide how to display that geographic data visually as a recognizable map. This is called symbolization. Symbolization involves making rules to determine which data elements to display and which to hide, what the color, size (for instance width of roads and rivers, color of National Forest boundaries, etc.), character fonts, etc. will be like, and how they will look at different zoom scales. Many data sets come with already- encoded default symbolization which can be modified to a greater or lesser degree. Some phone apps will offer data sets symbolized by third parties; for instance, USGS has their own preferred map symbology (rendered stylistically similar to the old USGS print topo map series). Other GPS applications use their own customized, propriety symbol key, based on their own aesthetics and the perceived needs of their end-users. The better application developers (usually at higher subscription levels) will offer a both in-house and a variety of out-of-house custom symbolized vector-based maps as well as georeferenced raster maps (i.e. aerial imagery), often at the global level. Entire data sets may be too massive to live on your phone and must depend on an active internet connection (unless you pre-download portions of them).
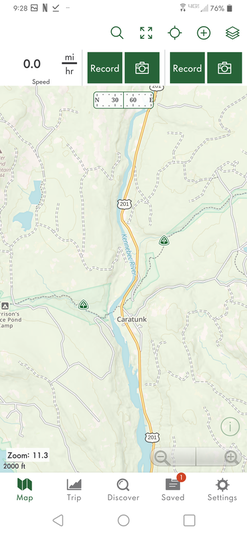
Gaia GPS is perhaps one of the more popular apps that offers global coverage. A basic Gaia subscription (free) comes with Gaia’s own custom-symbolized vector-data map derived from OSM. A Premium subscription ($40 in 2021) offers a wide variety of third-party vector and raster-derived maps, and the ability to overlay vector data onto other vector data and raster data-derived maps (for instance, a layer showing contour lines over an aerial image). Because Gaia is built to tap global data (you can if you want, view secondary roads in North Korea for instance), it cannot curate and correct the data that it makes use of. If it were to do so, its application would be unaffordable to anyone except millionaires. With Gaia, you’re paying for global coverage and diversity of maps, not global custom curation or extremely high accuracy of discrete geographies (though much of the data it uses is in fact extremely accurate, and GAIA does offer curated National Geographic raster hiking maps at is premium subscription level).
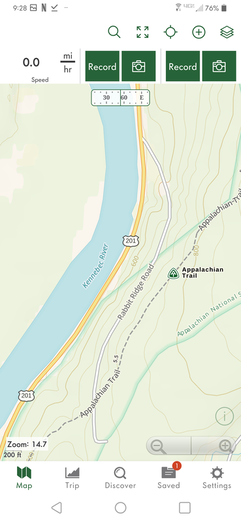
For instance, FarOut (originally Guthook, presumably renamed to sound more hikerly and to trade in the creepy mental associations for. . .I don't know, hippie psychedelic ones?) is an application developer that got their start providing curated vector-data maps of the Appalachian Trail to through-hikers and section hikers. It’s affordable because the geographic coverage it services is in high demand (National Parks and the A.T. are popular; people will pay for intensively curated maps of them) and the geography is limited (a linear corridor, a park boundary). A full set of curated A.T. maps from FarOut costs (as of 2021) a reasonable $60. The custom route and trails feature data typically live on your phone once purchased; you don’t need an active internet connection to view them or find yourself on them (but you may need one to view the underlying OSM-derived basemap or satellite imagery basemap if you don’t tell FarOut to download it too). FarOut’s limitation, of course, is the depth of your wallet and lots of blank spots on the global map.
Avenza-purchased maps also typically live on your phone and don't require an internet connection. The accuracy of these maps depends on when they were published and how much has changed since then; because they are static, copyrighted images they cannot be tweaked until updated by the original copyright holder. Avenza is limited in the same way FarOut is limited—you pay per map, and there are lots of blank spots on the globe. Another drawback of Avenza is that it relies largely on static raster images: the map elements don't usually adjust when you zoom in or out-- print and features quickly become illegible as scale increases.
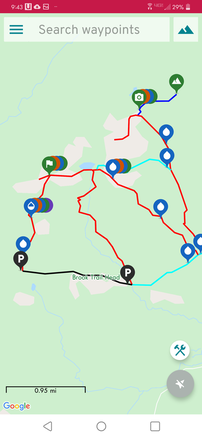
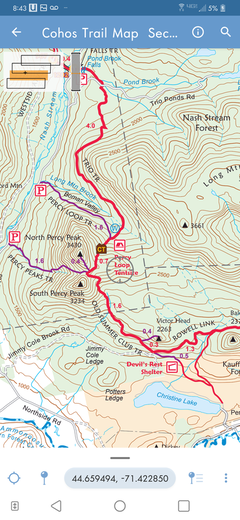
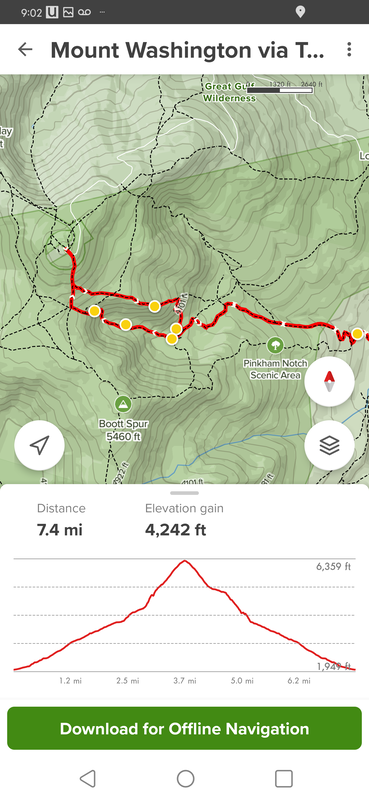
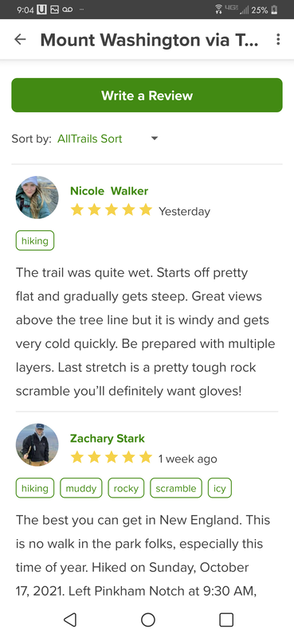
A fourth category includes applications that start with an OSM-derived basemap and overlay it with crowdsource data generated by users. AllTrails.com is probably the best known application on this front; it offers a no-frills OSM-derived basemap over which crowdsource-generated individual suggested hikes are presented: The crowdsource elements include a red line showing the suggested hiking route, a simple text description, an elevation profile, pins indicating feature points, and ratings and reviews of the hike from the application user community. Typically, the user-generated content (from both experienced hikers and complete greenhorns) is only minimally curated by AllTrails to eliminate the most egregious of errors and mischief (and then sometimes only after someone complains), but on the flipside Alltrails’ gigantic contributing user group captures some obscure and interesting off-the-beaten-path hikes, as well as many popular hikes. Because curation of user-content is sporadic, it's very important to scan the AllTrails user reviews: there, other hikers will share problems they had with the hike. Read the reviews to be informed before you go. If the reviews suggest that the hike is sketchy or not as described, you'll want to take that into consideration. It is also important to pay attention to the underlying OSM basemap, which may show additional trails and routes in the same area, and may show the actual names of the trails (instead of the contributor's name for the hiking route, which may co-opt more than one trail without mentioning it). Alltrails, rightly or wrongly, gets no end of shit from the elite hiking community: "rightly" because with any social media experience, you have to use your discriminating intelligence to help you decide which information is good, which is mediocre, and which is untrustworthy (instead of having someone conveniently do it for you-- provided you have discriminating intelligence of course). And "wrongly" because Alltrails is the poor man’s (and globetrotter’s) alternative to bankrupting oneself by purchasing individual, pro-curated hiking maps and guides for every geography one may visit and want to go hiking in. IS IT MY PHONE, OR IS IT ME? Most smartphone apps offer a variety of controls to help you view the map (or maps) and interact with it. Some of these features come with the basic subscription, while others require more dollars to activate. Features typically include the ability to move the map around on the touchscreen with your fingers, a cursor to locate yourself on the map, the ability to determine whether the map always points north or rotates in the direction you are heading, the ability for you to upload or create pins and hiking tracks to your map, the option to download sections of maps for use when you’re in an area with poor cell service, and the ability to share information with other users of the same app—among other functions. Sometimes these functions are engineered exceptionally well to work with a wide variety of smart phone device packages (make and model of phone, Apple or Android platform, etc.) but sometimes the design works less well on some phones (which results in certain quirks or failures). Note that you may have to tweak some of your phone settings to ensure that your phone and app are working together efficiently (battery use settings, location settings, screen use time out, app permissions and exceptions, etc.). Most modern smartphone devices are capable of locating you on the surface of the earth (latitude and longitude) with excellent accuracy via both cell phone towers and satellites (your elevation may be a bit less accurate). Essentially, the phone engages tower and satellite signals and triangulates your location from them. The GPS accuracy of smartphones these days is equal, or nearly so, to most non-survey grade dedicated GPS devices (like many Garmin models). Even if you switch to airplane mode your smartphone can still geographically locate you in a map application by sensing those signals (unless you’ve disabled that functionality on your phone). This accuracy will vary depending on obstructions. If you’re underground or within a building with thick walls, you won’t be able to pick up satellites or cell towers, and so your phone won’t know how to locate you on a map. Likewise, accuracy will be reduced if you are under a heavy tree canopy covered with snow, within a building, or if you are standing near a large object capable of reflection —a building, vehicle, or cliff face for instance—which may cause signals to bounce around, scrambling triangulation a bit. In the best of conditions accuracy is usually within sixteen feet.
Battery life is map life. Battery life is highly variable and depends on your phone make and model, how old your battery is, and how many other apps you’re simultaneously running (in the background and foreground). Newer, higher end models can last as much as five or more hours while tracking (tracking your hike is a significant drain on battery life). Older, cheaper phones may burn out in an hour or so while tracking. Some phones (i-phones are notorious for this—really, it should be a crime) will falsely register cold weather as low battery function and will spontaneously shut down when temperatures drop below freezing—even if the battery is fully charged (older i-phone batteries tend to do this with heinous frequency). Once you run out of battery life, unless you have a paper map as backup—or excellent geographic memory—you’re pretty much flying blind. You can conserve battery energy by closing unused apps and limiting background app function (airplane mode), pre-downloading maps of the area you plan to hike in, checking your display conservatively, turning off your phone during overnights and long breaks, and limiting your route tracking. If you have an old phone with a weak battery, you might want to consider a phone upgrade. If you do upgrade, you may want to consider a model with a larger screen, so that you can more easily view maps.
Needless to say, exposure of the phone to the elements and hardships of hiking can result in phone damage and failure. Some phones are manufactured water resistant or waterproof while others are not. A water-resistant, shock resistant case is a wise accessory (even with watertight phones, because charging ports that take on moisture can sometimes malfunction until they dry out). A tightly sealed zip-loc bag can be used in a pinch to protect against moisture if you don’t have anything else, as can the pocket of a good shell rain jacket. If your phone's wiring does get wet, it's best to power it down completely and let it dry for an extended period of time before trying to restart it. THE MAP & COMPASS VS APP DEBATE Not all hikers agree that smartphone apps are a good thing. But unlike some of my peers I'm hesitant in jumping on the smartphone GPS beatdown bandwagon, for the simple reason that there just isn't thorough, extended research on how the use of GPS apps may contribute to hiking mishaps or improve hiking safety, and under what circumstances and conditions. Nor, for that matter, is there much more than anecdotal evidence to suggest that combined map + compass toting is a statistically significant factor in modern hiking safety. In the annals of "death in the mountains" one can point to a lot of incriminating factors (improper clothing, unrestrained ambition, didn't check weather report) but smartphone app use doesn't rank high among them, if it registers at all. The technology is new and the jury is still out; maybe we will find that it does exacerbate fatal mishaps, or maybe we'll discover that, in general, app use actually increases safety or is a wash (it being the case that foolish is a human constant, pre and post GPS). I know plenty of people who carry a map but don't familiarize themselves with it before they hike, and carry a compass religiously but don't really know how to use one (with regard to the latter, one might as well carry a rock in one's pack instead). It's hard to make the case that the newbie who relies exclusively on an AllTrails app, having a good understanding of the app and the route shown in the app, is more of a risk than the more experienced hiker who just keeps a token map in their pack and last looked at their compass ten years ago when they took their first and only intro-to-nav course--inaccuracies of crowdsourcing be damned. But if either need SAR intervention, you can bet that the careless map & compass bearer is less likely to have their preparedness slandered.  Too, among the hiking community (and greater adventure sports community) I notice a penchant for a double standard in criticism. For instance, ambition-over-caution has inarguably been a cardinal factor in not a few mountaineering deaths worldwide, but the adventure sports community continues to make a fetish of ambition and risk (base jumping, anyone? class 5 free solo rock climbing?). It may be that the only difference between an out-of-shape greenhorn getting killed by over-relying on a GPS app in the White Mountains of New Hampshire and a mountaineer pushing themselves to death on Annapurna is the questionable value we place on glory and athleticism (I'll get back to risk in a bit). Although my own personal practice is to carry a paper map and compass on most hikes, I’ve made high use of smartphone GPS apps to make the hikes I’ve participated in safer and more enjoyable, and I don't consider it a lesser tool. For example, when bushwhacking with smartphone GPS, I have the advantage of not having to religiously follow a compass bearing up a mountain, which means that I can zigzag and meander to utilize more friendly terrain and visit obscure view ledges visible only in the aerial imagery that my app is showing me. Easier routes reduce fatigue, which in turn increase safety and enjoyment. And there are times when it is safer and more practical to pull out the smartphone GPS than try to fuss with a map and compass: for instance in high wind or cold temperatures. For sure, taking the time to learn how to use your GPS app is key to having a positive experience with it and your hike (waiting to do that until you’re caught in a winter whiteout above treeline is a potentially deadly form of procrastination). But if you have trouble reading a paper map you’re probably going to be just as map-illiterate reading a GPS map. Some people will get lost in a closet: if you’re one of those people, it’s your karmic burden to learn how to read maps. Don’t expect your device to do it for you. 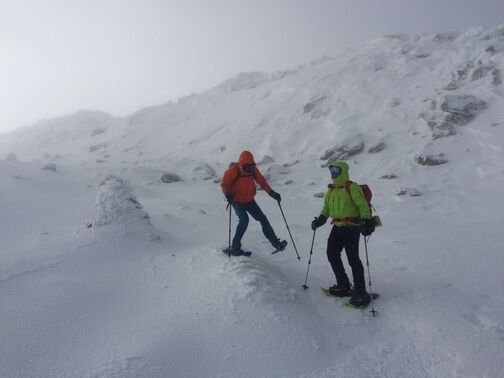 No one was going to do a map & compass reading in this high wind and brutal cold on Boott Spur. Because Murphy’s Law is a constant, and given that more complicated systems have more points of potential failure (you drop your phone off a cliff, your battery dies, you suddenly lose cell coverage, your smartphone GPS subscription runs out, etc.), maybe it is wise to carry a paper or synthetic fabric map (blows away in the wind, gets too soggy to read, a bear eats it, you were short on toilet paper) and GPS app when the hike you’re planning has a certain degree of risk (maybe practice those compass skills, too). How to evaluate risk? Risk is based on a set of variables that includes your physical ability, hiking-wisdom, geographic knowledge, preparedness, and the prevailing conditions of the hike itself. I have, for instance, been up Mount Monadnock so many times that I could probably find my way back down blindfolded through a blizzard. But evaluating risk is a catch-22: you get better at evaluating it the more you hike, which means you always have to be careful to not get in over your head. At the end of the day, the reality of today’s electronic culture can’t be dismissed by standing on the back of a chair with a map of the Adirondacks tattooed on your chest and admonishing hikers these days! nor can the practical economics of not having to buy paper maps and guidebooks whenever and wherever you happen to want to hike on the surface of the earth. As a rule of thumb, for shorter, less remote hikes in good conditions with a sufficient battery charge, and after verifying that your particular trails are in fact included in the GIS data your GPS application is using to create their maps (not always the case), bringing along a paper map (and compass) may be redundant (if a smartphone wasn’t useful for so many other things, one could make the reverse argument). 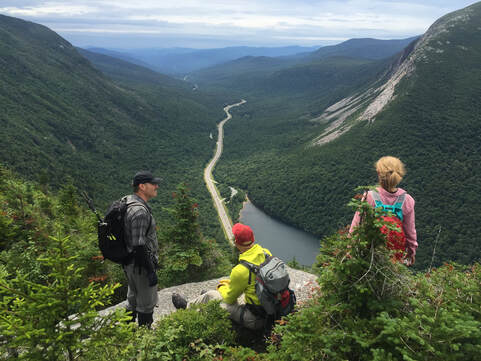 We made good use of GaiaGPS to locate and visit a variety of hidden ledges on our bushwhack up Eagle Cliff in Franconia Notch--nice spots which I've noticed many other hikers miss. As for what app you should carry on your phone, if you are a dedicated regular hiker and not working on a shoestring budget, it might make sense to have several providing they offer contrasting advantages. If you’re working on a tighter budget or if you hike less frequently, one may suffice. An app like GaiaGPS is a good, all-around, general-purpose app that is going to give you very good to excellent accuracy wherever you go on this fine earth. A higher Gaia subscription level will give you so many different map options that you won’t know what to do with them all. If you are planning on hiking in a specific geography for an extended period of time (a long hike on the PCT, or you spend a lot of time hiking in a nearby national forest), an app like FarOut or Avenza will allow you to purchase a highly detailed map of your stomping ground at a very reasonable price. If you are new to hiking and are just looking for some light to moderate hikes in not-so-remote places (with the possibility of branching out later), Alltrails can be a very good resource because it offers a multitude of suggested hikes that others have done before with route descriptions and user-community reviews.  Another GPS-assist off the beaten path in the White Mountains. THE VALUE IN GETTING LOST One of my favorite pieces of literature is William Faulkner’s The Bear. In it, the protagonist, a teenager and budding hunter growing up in rural Mississippi in the early 1900s, decides to track down an enormous, legendary black bear that has raided chicken coops and corn cribs for decades but has never been caught. When he first sets out to find the bear, he brings all his backcountry hunting and survival gear with him, but he catches only the faintest trace of the bear. Over time he comes to understand that his gear is an obstacle to his greater understanding of how to track down such an elusive animal. It’s only by entering the wilderness without props (he even leaves his hiking stick behind) that he finally develops the tracking skill to succeed.* The most profound learning occurs when we’re in a challenging spot (but hopefully not a life-threatening one). Nothing will teach you to read a map and parse a trail better than misreading one and having to painfully backtrack several miles uphill in the pouring rain to get where you’re going. Nothing will teach you how to read the natural landscape better than losing your map and having to find your way out through subtle cues that you may have sensed but never engaged during your map-dependent hikes. Fumbling with your GPS app is not unlike fumbling with a map and compass: if it doesn’t kill you or discourage you from ever hiking again, it’ll boost your learning. Of course we ought not to be so reckless than we endanger ourselves and others, but we ought not to be so risk-adverse that we stunt our learning. Sometimes that’s a fine line to walk. Like the protagonist in The Bear, the highest state of geographic zen a hiker can ever achieve is to learn how to tell direction and weather by natural cue (no maps or instruments), how to survive and adapt with a minimum of gear (anyone heard of Grandma Gatewood?), how to know the land through an intuitive map imprinted in the brain (via repeated familiarization and/or wise extrapolation of common geographic patterns), and --lastly-- to use technology (from the map right up to the device) to supplement, not replace, that wisdom. But that takes time, practice—and getting lost. Here’s to getting lost and found. --Paul-William *There's been some banter about whether or not using a GPS device causes part of our brains to shrink. Although the jury's still out on that one, it it is true, I cannot help but wonder if our brains started shrinking when human beings got used to using maps and compasses instead of having to parse distance and location through cro-magnon brain power and memory alone. |
TOPICS
All
Humor (The Parsnip)

|
 RSS Feed