THE BASICS Water is (almost) everything Dehydration on a hot day can result in debilitating heat exhaustion or life-threatening heat stroke. If you don’t have a cast-iron gut like me (I frequently drink untreated mountain stream water), either bring plenty of water with you and/or bring a means of purifying wild water. Unfortunately, “plenty” is relative to your individual physiology and physical conditioning, the environmental conditions you’re hiking in (shade/full sun, temperature, wind, humidity), your level of activity, what you consumed prior to and during hiking, and the distance and elevation gain you are hiking.
It’s not just water, it’s electrolytes: When you exert yourself, especially on humid days, you sweat out important nutrients (especially sodium and potassium) that balance the chemistry of your body. If that chemistry is out of balance, you can “bonk”, i.e. lose energy rapidly, become nauseous, experience painful muscle cramps, or collapse. Electrolyte imbalance can exacerbate conditions that lead to heat exhaustion and heat stroke. To compensate for electrolyte loss, practice nutritional eating habits (especially in advance of your hike) and bring balanced food with you and/or bring electrolyte supplements. Natural foods that are good for electrolyte balancing include dairy products (including cheese, yogurt, and powdered milk), coconut water, pomegranate juice, watermelon, avocado, spinach, and bananas.  Nuun electrolyte tablets Manufactured electrolyte supplements come in a variety of forms including pre-mixed drinks (like Gatorade), tablets to mix with water, “goo” or gel form supplements, and certain brands of energy bars. In the summer I always carry emergency electrolyte tablets in my 1st aide kit and I usually eat a couple bananas as part of my pre-hike breakfast. Some people pre-treat their to-go water with electrolytes. You can even freeze a liter of juice and or electrolyte water mixes the night before and enjoy a cool drink along the trail. If you are carrying a sleeping bag with you, you can wrap a pint or quart of ice cream in the bag, which will insulate it from melting for hours even on really hot days, and enjoy a cold and electrolyte-rich ice cream lunch.
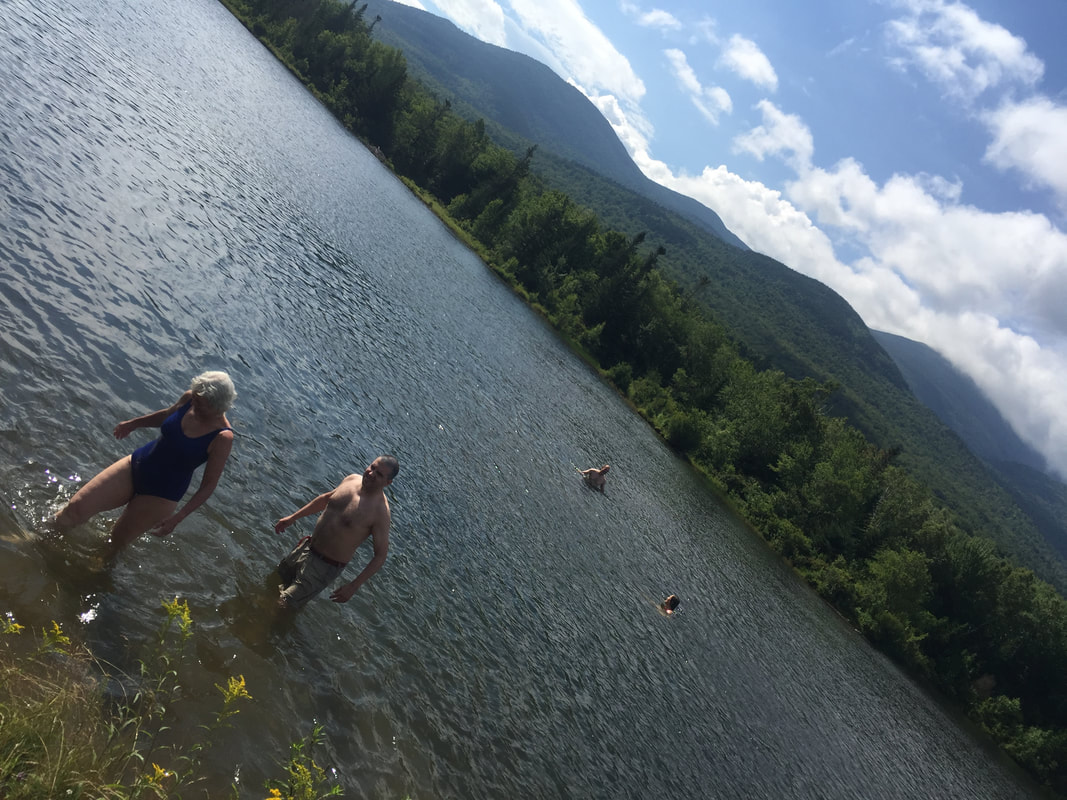
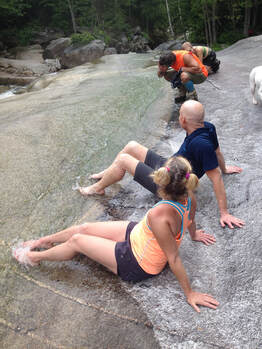
Hats with broad brims offer the best head protection but even a baseball cap will offer some sun protection. During your hike you can cool yourself by dipping your hat, bandana, shirt, or small pack towel in a creek and letting the water run over you, or plunge right in and take a dip—your clothing will likely dry off quickly on a hot day, but you could also take along a spare pair of shorts and a small pack towel. When resting, take your boots and socks off and let your feet cool (this will help reduce friction blistering, which is exacerbated by hot boots). For this reason, trail runners are often a better option than thick hiking boots on hot days. Lastly, remember sunglasses because. . . The devil is in the sun. If your route involves moderate to significant sun exposure (i.e. not just hiking heavily forested trails), bring sunscreen with a high SPF level (50+). If you do get sunburn, you’ll want to protect your skin from further damage; in such cases it’s wise to have brought a lightweight long sleeve shirt with you or an ultralight windbreaker. This can be helpful when your burnt skin—now less able to thermoregulate your body temperature—results in you getting a chill rapidly when temperatures drop later in the day (it’s even possible to become hypothermic by way of sunburn). Be aware that sunburn can contribute to heat exhaustion and heat stroke (as well as increasing your risk of developing skin cancer) by direct heating and by reducing your skin’s ability to thermoregulate. 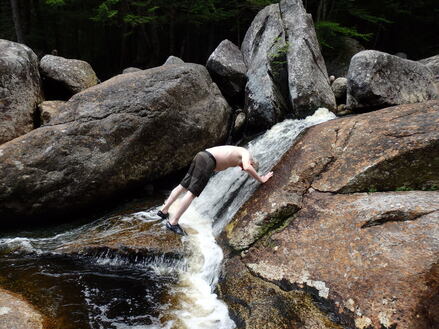 Hiker cooling off under a cascade. Understand the symptoms of dehydration and act to remedy it immediately. Quench your thirst when you feel thirsty. Eat when you feel hungry. Stop and rest (preferably in the shade or in a breezy area) when you feel tired. Don’t wait until you’re exhausted. Examine your urine when you pee: dark yellow urine is a sign of dehydration; whitish urine is a sign of good hydration. Intentionally slowing your pace and resting more frequently can help reduce overheating and dehydration, too.  Image: CDC Understand the symptoms of heat exhaustion and heat stroke (follow the link for the full run-down). In a nutshell, heat exhaustion begins to develop when you’re moderately dehydrated, with or without an electrolyte imbalance. It is characterized by moist skin (often described as clammy or cool, but not always so if someone has been exerting themselves), exhaustion, and can include dizziness, muscle cramping ("heat cramps") and nausea. Heat exhaustion is treatable by getting yourself in the shade and/or cooling yourself in a brook, drinking and eating to replenish lost water and nutrients, and resting. If left untreated, heat exhaustion can lead to heat stroke—a life threatening and harder to treat condition. Heat stroke is characterized by extreme exhaustion or collapse, hot, dry skin with elevated body temperature, and impaired mental status—those suffering from heat stroke may not be aware of their danger. Unless treated it leads to loss of consciousness, organ failure, and death. People with heat exhaustion will usually need help—get them out of the heat, cool them off with water or wetted clothing, and if they are conscious and can tolerate it, feed them fluids and food—then help them find the shortest way out of the woods. This may require rescue services. Recovery times can be long and permanent organ damage is possible. If you are doing all of the things you need to do to remain cool(er) and hydrated but you still feel unusually fatigued, consider shortening your hike or turning back. PREPARATION MATTERS
 Hiking in cloudy weather or light rain can be a good option on hot days. DESTINATION AND TIMING In addition to preparing with appropriate gear and self-care, you can also make your hot weather hike more enjoyable by tweaking your itinerary and the timing of your hike. Time of day, season, and weather: Hot spring days can often be harder to bear than hot summer days because of the lack of leaves on deciduous trees and the fact that your skin and body aren't yet accustomed to full-on heat after all that winter hiking—don’t underestimate the difficulty of hot spring weather hiking. On hot days either in spring or summer, it makes sense to start hiking earlier in order to get some miles under your belt before the sun heats up the air. Alternately, you can start hiking later in the morning and enjoy the early evening cool-off along your descent—but keep in mind that (if weather conditions are otherwise constant) early morning temperatures are typically going to be cooler than early evening temperatures. Take advantage of rain forecasts: predictions of light rain on really hot days can be excellent conditions to hike in as long as you don’t mind getting a little wet, but keep in mind that warm rain at low elevations can turn into cold, hypothermia-inducing rain at higher elevations. During the hot summer days of my 1994 Appalachian Trail through-hike I often hiked in the rain in a T-shirt without a rain jacket; this practice not only cooled me off fast it also kept my rain jacket dry for use later in the day and helped wash some of the sweaty crud out of my shirt.
Even lower elevation mountains can offer cooling breezes: on summer days rising hot air in valleys can cause strong updrafts of cooling wind on exposed areas of higher ground, especially around cliff faces. In the northeast, the prevailing natural wind is often from the west or southwest on sunny days, so hiking the western side of the mountain may be windier and more cooling than hiking the eastern side. Keep the sun in mind, though: exposure above treeline may increase the risk of sunburn. Deep, wooded stream valleys are often cooler on average than ridges or flats, and can offer the added pleasure of a dunk in a creek. As a rule, the northerly slopes of mountains are going to be cooler because they have less sun exposure, ridge tops are going to be warmer (but windier if they’re exposed), and oak or pine dominant woods are going to be warmer than maple, birch, or boreal spruce-fir forests. The relative warmth of these forest types also mirrors how soon brooks will dry out in summer. Open fields and meadows are among the hottest landscapes in the summer while areas with significant boulder fields will trap cool air and may even hold ice into the summer; these places can provide drafts of natural air conditioning (some famous examples include places like New Hampshire’s Ice Gulch, Devil’s Hopyard, and Subway in King Ravine, Vermont’s White Rocks Ice Beds and Smuggler’s Notch, and Maine’s Mahoosic Notch, among others). Planning hikes that place a good swimming hole near the end of the hike can be both pleasurable and advantageous; on really hot days plan hikes with swimming holes at several points along the route. By choosing appropriate destinations and routes, and timing your hike with daily heating/ cooling cycles, you can often craft a hike that maximizes comfort on a hot day. For instance, starting early up a wooded ridgeline or warm side of the mountain in the morning (which would be hot in the afternoon), then traversing an open windy ridge mid-day, and finally descending along a cool mountain stream in a forested ravine in the afternoon is an excellent itinerary to beat the heat. 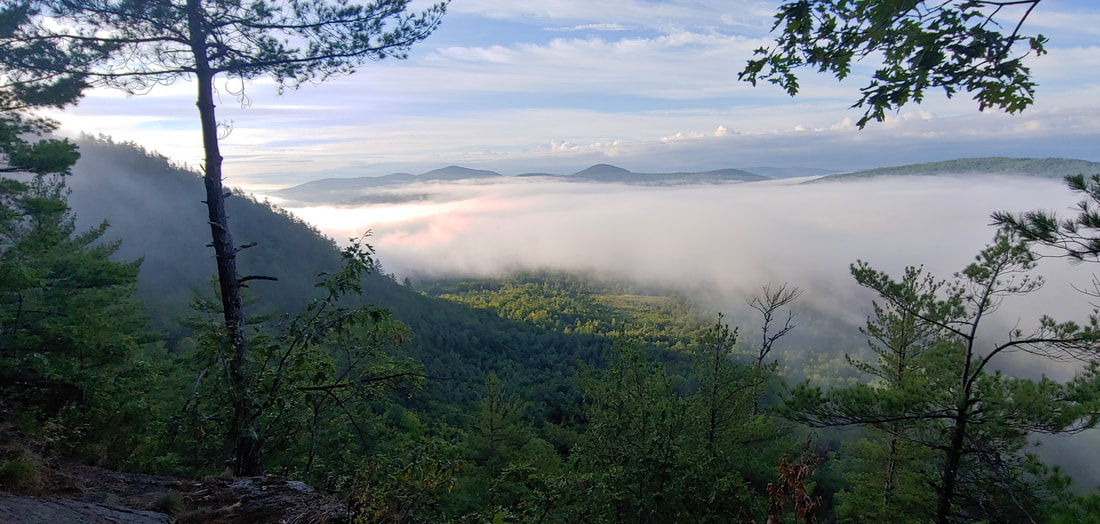 An early morning hike up to Glassface Ledges in Maine on a hot day offered delightful views above the morning valley fog.
0 Comments
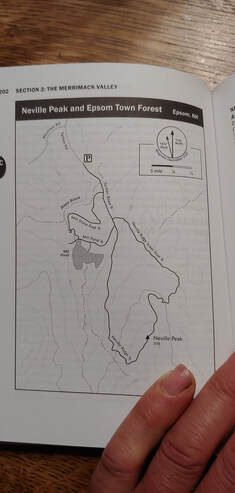
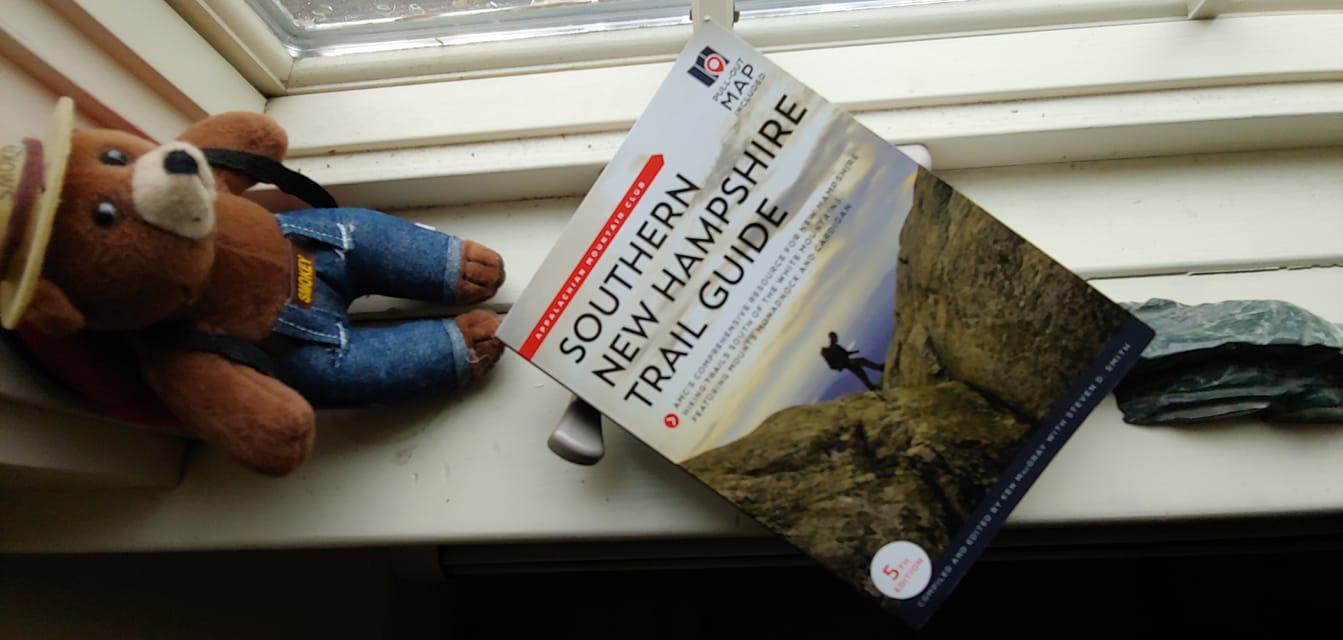 This latest (5th) edition of the Appalachian Mountain Club’s Southern New Hampshire Trail Guide (edited by Ken MacGray and Steve Smith) adds a ambitious variety of new hikes to the previous edition’s inventory, most of them with summit views or other inspiring features. At the same time, the 5th Edition strategically condenses descriptions of a few sprawling “nature trail” networks (ex. at Bear Brook). This has left more room for new and exciting hikes including Bayle Mountain and Whitten Woods in the Lakes Region; Jerry Hill, Great Hill, Pulpit Rock, and Neville Peak in the Merrimack Valley; and the amazing Tippin’ Rock in southwest New Hampshire, among others.
Twelve new in-page maps were added to the 5th Edition (bringing the total number of maps to thirty-five). The traditional folded paper map in the back pocket of the guide detailing the popular Monadnock, Cardigan, Sunapee, and Belknap trail systems is still included (frequent flyers to these places might want to separately purchase the more durable Tyvek edition of this map). The 5th Edition also adopts the more recent data presentation redesign used in the latest White Mountain Guide, making it easier to find information at-a-glance. MacGray and Smith’s best efforts to press the AMC to further fatten this edition of the Guide weren't enough to prevent a couple disappointing “blank spots” on the map, notably some worthy hikes in the Connecticut Valley region south of the White Mountains and various recently acquired open space reservations of the Society for the Protection of New Hampshire Forests (Forest Society). Regarding the latter, the Forest Society sadly declined to enter its newer hiking destinations into this edition of the guidebook (the Society, a non-profit land conservation and advocacy organization, is instead directing hikers exclusively to its own media to increase its fundraising profile). One might also find oneself pining for a bit of strategic overlap between the White Mountain Guide and the Southern New Hampshire Trail Guide (Squam Range?) to lessen the impact of the forced geographic schism in coverage between the two guides (but then again, state lines are just as arbitrary). 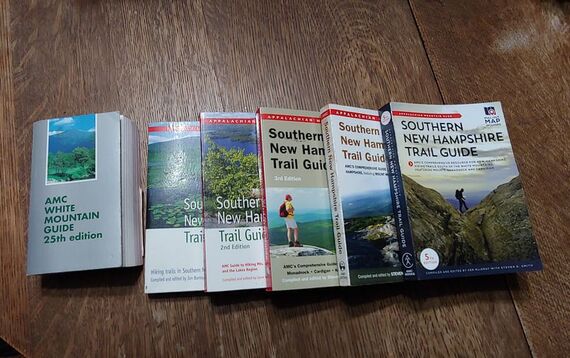 Evolution of the Southern New Hampshire Trail Guide from 1st edition through 5th. The last edition of the White Mountain Guide to include southern NH trails is shown on the left. These days, with so much online trails information available free or at a small charge (often associated with a GPS app), it's fair to ask "why do I need a physical guide book and map?" Apart from the wonderful physicality of a book and paper (or fabric) map and the artistry that goes into writing hiking guides, the AMC, in its guide series, has long proven itself as the most accurate, comprehensive, and easy to understand source on hiking in the northeast. Where crowdsource apps (like Alltrails.com) frequently contain unvetted, inaccurate data, AMC guides continue to offer trustworthy information. The trail detail routinely included in the AMC guides is particularly useful for helping inexperienced hikers find their way and/or choosing hikes appropriate for their skill level. It's also helpful for any hiker attempting trails that are poorly marked. The guides also include a whole lot of interesting details about the peaks and trails that you won't always hear about on social media or through apps (MacGray and Smith are particularly steeped in this lore and sprinkle it liberally throughout the 5th Edition), making for fun pre-hike reading and planning. Although it is the case that those who want to hike throughout the good state of New Hampshire may feel compelled to jam a crowbar in their wallet and invest in (at least!) two hiking guides (White Mountain Guide and Southern New Hampshire Trail Guide)—there is just too much good hiking information to fit into one single guidebook these days. Some “older” hikers will recall how the Southern New Hampshire Trail Guide budded off from the bible-fat White Mountain Guide in 1998—a lamentable but necessary split, but I do believe most hikers will agree that the burgeoning inventory of good hiking trails across New Hampshire is anything but lamentable. Let’s raise a toast to more (and fatter) hiking guidebooks to come! --Paul William Finding Gear During the Pandemic: Burton Snowboard Pants Make Good Substitute Mountaineering Pants3/8/2021 Review of Burton's Ballast Shell Snowboarding Pant, for Use in Mountaineering
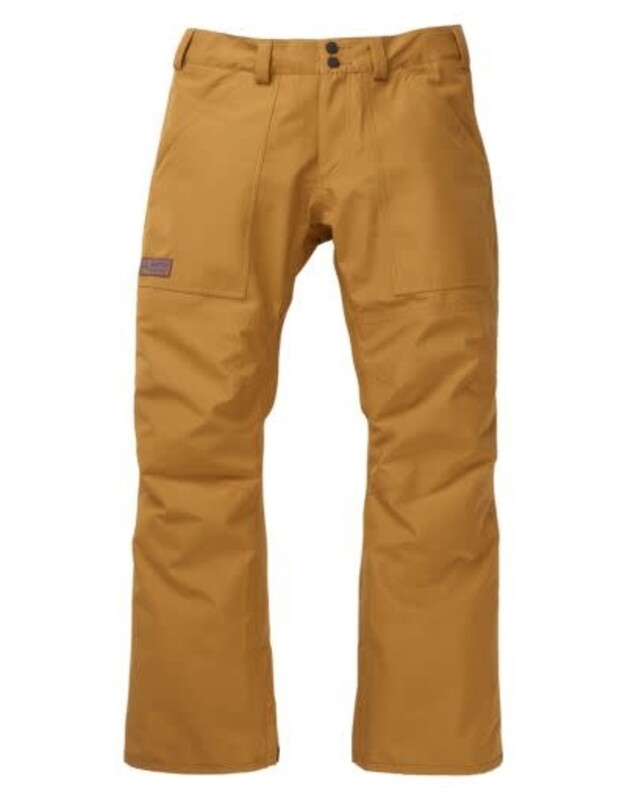
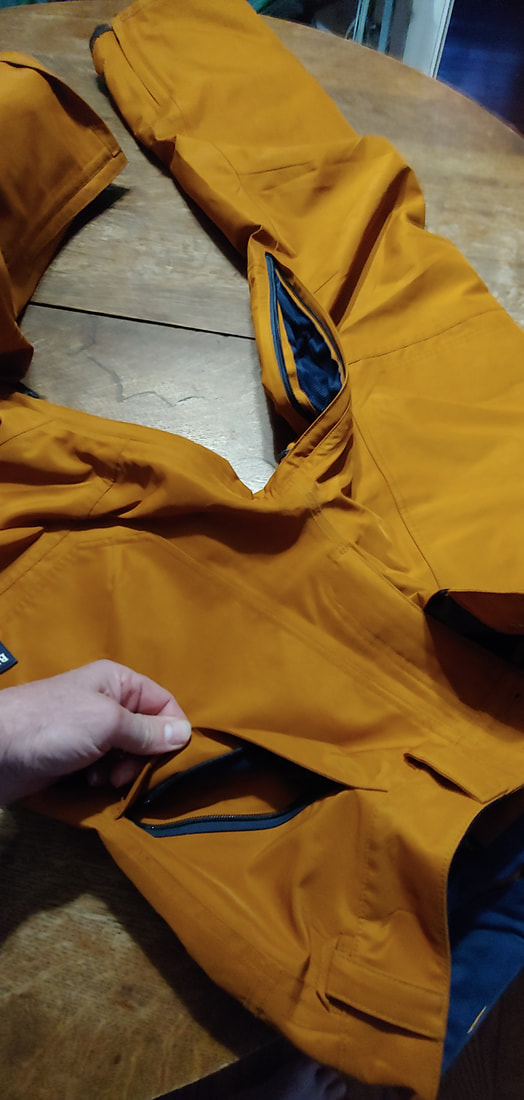
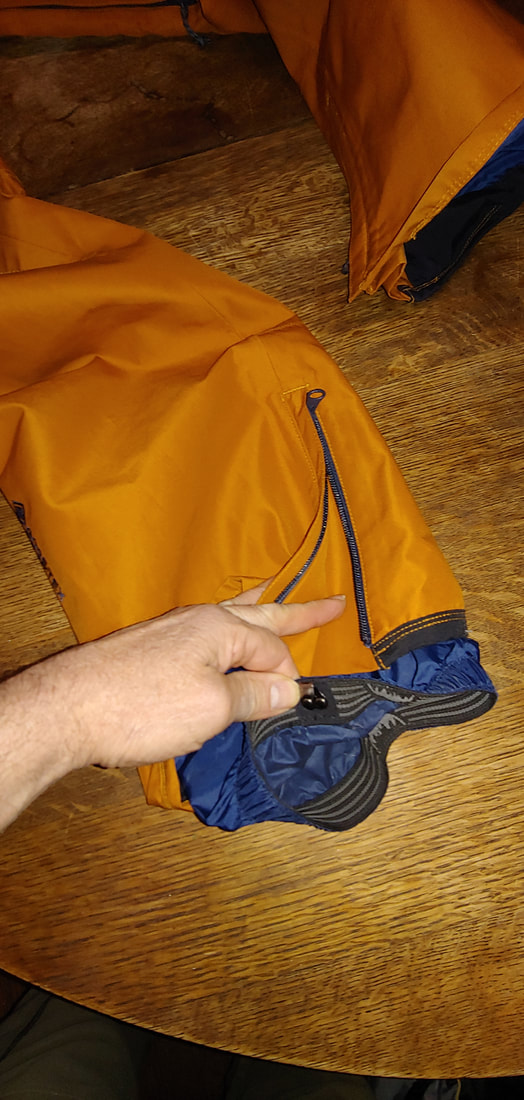
and workplace Covid safety (for example, creating more physical space between employees on the production line). On the demand side, people who wouldn’t normally be spending a lot of time outdoors are now doing so because their usual means of entertainment or physical exercise have become unavailable during the Pandemic. No sporting events, movie theaters, bars, gyms, yoga classes, etc. So: people are buying more outdoor gear and emptying the shelves. Adding insult to injury, the increase in demand and the increase in manufacturing costs have caused the price of gear to rise. Shakespeare famously said “misery makes strange bedfellows” and such has been the case in the world of outdoor gear during the Pandemic. People have been gear-hacking (using ordinary items as substitutes for specialty outdoor gear), cruising the used gear market with unusual zeal, borrowing gear, renting gear, wearing their gear threadbare, and (to get closer to the point) looking outside of the normal gear market of their particular outdoor sport. Gaining weight has also been a side effect of the Pandemic, adding more woe to those who have outgrown and need to replace hiking clothing. My size medium Marmot mountaineering pants, which had fit me just right in 2018 and 2019 (without a lot of room to spare, unfortunately) had become unpleasantly tight around the waist. Since I was planning a lot of serious winter mountain hiking (including an overnight trip to Baxter State Park) I needed a new pair of shell pants. Trouble was, almost every brand was sold out of my size—Patagonia, North Face, Marmot, Black Diamond, etc. (Arc'teryx was still in stock—but I’m not a Rockefeller). So I started looking further afield, at gear built for sports that are similar to mountaineering. And I landed on the website of Burton—famous for their snowboards and snowboarding gear. I have never snowboarded and wasn’t familiar with Burton, but I could see that they were building some sturdy, waterproof, snow-proof shell pants that probably could double as mountaineering pants in a pinch. Burton offers about a dozen different shell pant models with a range of prices comparable to good quality respected-brand mountaineering pants. Their pants come in a variety of fits (“regular” and “baggy”), lengths— and color choices. And they were NOT out of stock. After some waffling, I settled on a Burton’s Ballast Pant in a nice “true penny” coppery-ginger (a hue I particularly like) for a reasonable $209. The pants have features desirable for mountaineering: zippered heat vents, Gore Tex breathable fabric, soft waist band, roomy zippered cargo pockets for snacks and small gear items, built-in boot gaiter with clips, and sturdy fabric that won’t tear on branches. They also have a little pull cord behind each ankle, to cinch up the rear of the pant cuff and keep it from dragging under the boot during intense activity—a feature you won’t see on mountaineering pants (which may not have much utility outside of snowboarding). Above, showing zippered cargo pockets, heat vents, zippered cuff and gaiter, and velcro waist adjustment (click to expand). I took them for a shorter test-run hike, then the real test—four days at Baxter State Park—long miles, skiing, unbroken trails, deep snow-- (to use snowboarder parlance, why not) “gnarly” conditions. 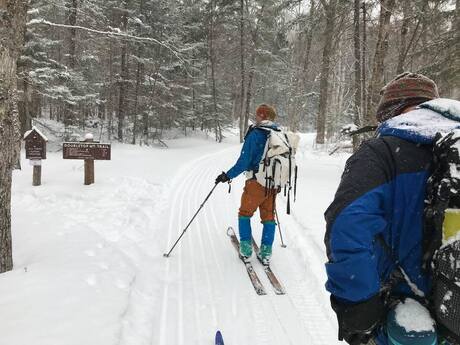 Burton pants in Baxter State Park with skis and OR gaiters I found my Burton pants warm, comfortable, and tough. We broke a lot of trail through deep snow during the trip, and on the way out of the park it rained on us—but the pants remained dry throughout. I used the pants during vigorous skiing and snowshoeing outings. At temperatures above 15°f with light wind I found that I was comfortable wearing just a pair of short underwear beneath, zipping the heat vents open or closed as needed. They vented well, and I stayed warm and dry the entire day. For lower temperatures, a pair of long midweight underwear beneath was sufficient to keep me warm. I suspect that above 30°f on a sunny day with no wind could make the pants too hot—but I have yet to test them under those conditions (and might not wear a mountaineering shell under those conditions anyway). The large zippered cargo pockets were ideal for keeping a robust cache of warm snacks, a trail map, phone, spare glove liners, and a headlamp—and they kept out the snow and rain. Although the pants have an inner Velcro waist band adjustment, I found that I also needed a belt to keep them snug at my hips—but this may have to do with the fact that I had bought a pair near the outer range of my hip-size. 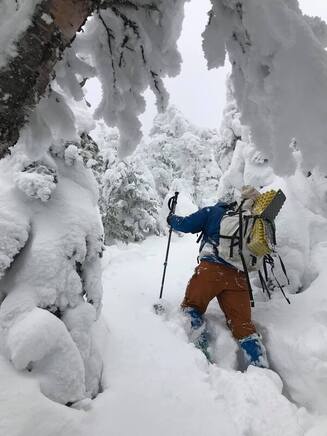 Breaking trail on South Brother There were just two minor drawbacks: I noticed a little tightness in the thighs when lifting my legs up high to overcome snow drifts on the uphill, but it wasn’t enough to cause me any noticeable fatigue over the course of a long day of hiking. And the built-in gaiter was a little loose around the ankles—probably because it was built for burly snowboard boots, not hiking boots. It did keep snow out of my boots most of the time, but I had to supplement with my Outdoor Research gaiters to remain completely snow-tight during extended trail breaking through deep snow. But I normally wear my gaiters with shell pants anyway, so no big deal. The pants would be an even better product with full-length leg zips but few manufacturers are making mountaineering pant models with that feature. Overall, the Burton Ballast Pant proved to be a great find and a valuable addition to my winter hiking wardrobe. 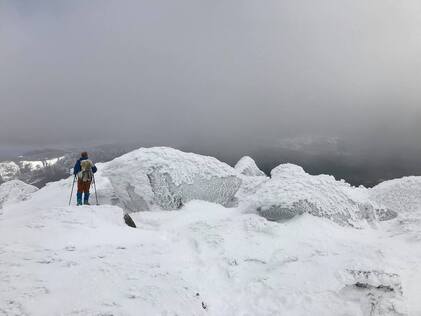 Enjoying the "view" on the summit of South Brother Baxter State Park photo credits: Doug Settele
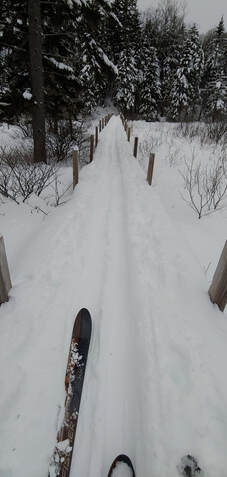
“Slog” is a very apt term for what is a sadistic exercise in mental endurance—especially at the end-of-day whilst physically exhausted, when distance-marking visual cues have evaporated in dusk. For those "slogged" When will it end? isn’t an uncommon fixation. Beyond the madness-inducing tedium, the slogs can also be physically painful. I have a longstanding knee injury; hiking flat terrain for a long stretch is harder on my knee than ups or downs because I’m locking my knee in a relatively rigid position and inviting repetitive-use fatigue instead of flexing out the kinks as would naturally happen on irregular mountain terrain. Doing this in snowshoes or boots over hardpan monorail can be even more grueling. Although my handicap isn’t universal, I’ve spoken to more than a few people, both knee and hip-impaired, who have the same issue with the slogs.
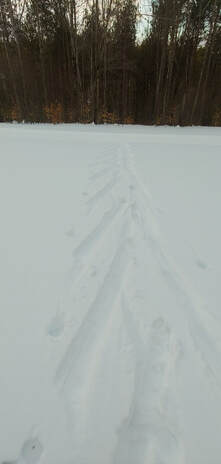
. . .and yes, it counts towards your winter list dibs. As long as snow conditions are favorable, you can shave off a little time, a lot of fatigue, and add a little extra fun into your adventure. I use this method almost exclusively for the long flat winter approaches, and I weep with pity as I pass those poor wretches limping out in snowshoes. How it helps:
What approaches it's good for: Out-and-back hikes with long, relatively mild terrain: Lincoln Woods Trail, Zealand Road, Sawyer River Road, Gale River Road, etc. In Maine, it can be used to get to some of the “Sixpack” Hundred Highest Peaks, Mount Abraham via the snowed-in Firewarden’s Road, and to the base of Katahdin or the Brothers in Baxter State Park (lugging a sled into the park behind your skis, which is surprisingly easy). If you’re a fair skier you can even get a little further up some of the milder but narrower trail sections beyond the roads mentioned above, and if you’re a skilled skier you can throw in some steeper trails and open woods glade runs if conditions are right. When to do it: When the snow is good—deep enough to cover hard obstacles and exposed drainage channels. Ideally, the snow is broken out and not too icy or crusty; temperatures are below freezing. If snow is deep and unbroken, and you have company, you can take turns breaking it out with about the same effort or less as you’d expend with snowshoes, creating nice runs for yourself on your return trip. It is easier to ski out on a once-broken ski trail than it is to snowshoe out on a once-broken snowshoe track because the track of skis is continuous, flat, and uninterrupted, not choppy like snowshoes tracks. Avoid icy conditions and unbroken snow with thick crusts. Avoid trails with frequent or long steeps (unless you are a good skier), lots of narrow twists and ledge-hops, and open water crossings.
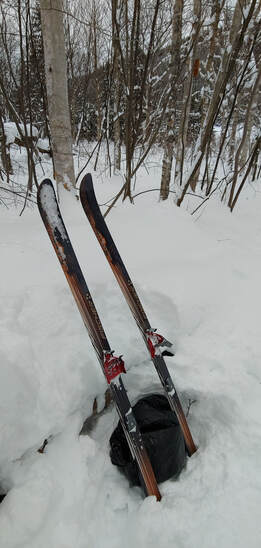
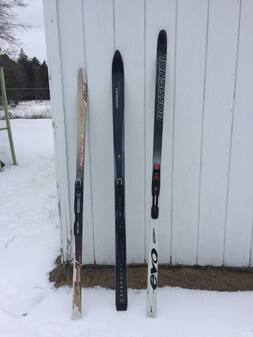
Gear you’ll need: Skis: Your best bet are medium to wide Nordic skis--many recent models are “shaped” (the width of the skis changes from the front to the ski to the middle, and again to the rear of the ski) which offers more turning capacity; look for outer measurements in the high 60cm range to the 112cm range. Generally speaking: the wider the ski, the more floatation, stability, and turning ability. You can use narrower Nordic skis with equal success if the terrain is milder, groomed, or fairly beaten out by other skiers (Lincoln Woods Trail and Zealand Road are often well broken out by skiers) or if you’re a good skier. The length of your ski will depend upon the characteristics of your ski brand and style vs. your weight— check the manufacturer’s guidelines. Other ski characteristics: you’ll want a steel edge to cut through rougher snow patches, and a climbing pattern on the bottom of the ski for ascending (which saves you the curse of wax-on, wax-off, repeat--visualize the Karate Kid--with different kinds of waxes for different temperatures and conditions).
Boots: First and foremost, make sure that your boots are compatible with your bindings! The hardware on ski boots is engineered to only work with a specific kind of binding. Second, you’ll want something light and fairly flexible for the long slogs; go with synthetic fabric or leather (not hard plastic). Third, make sure that you buy boots that have adequate winter insulation. Although you can hike in Nordic boots, you may not find them quite as comfortable on steep mountain terrain as hiking boots, but you can experiment—if you don’t mind hiking in them, you can save yourself some weight by not carrying hiking boots on your trip. The ducktail toe on 3-Pin boots might interfere with snowshoe and traction bindings, however.  Nordic boots built for use with 75 mm 3-pin bindings. Note the three holes and duckbill at the front sole of the boot. Poles: Ski poles or adjustable trekking poles with a snow basket attachment will both work fine. A wider basket is preferable for deeper, unbroken or minimally broken snow but a small trekking basket may work just as well on packed or groomed surfaces. I keep a wide basket on my poles all winter long.  Collapsible Black Diamond ski/trekking pole with wide snow basket. Gear you might want: Climbing skins (a fabric that is stretched across the bottom of the ski for extra traction) can be useful in places where the terrain is rolling with frequent short steep sections, and the snow is firm and slick. You can use the skins to help you climb and to slow your descent. A small plastic ski scraper can come in handy if you happen to slush your skis through running water on colder days. Several ski gear manufacturers make lightweight packable models (ex. Swix and Dakine); while most are intended to scrape wax off skis, they will work well for ice, too (if you have a climbing traction pattern on your skis, be sure to scrape front to back). If you plan on carrying your gear over some steep terrain for moderate stretches, take along a ski strap so that you can tie your skis together and throw them over your shoulder. Most skis come with a ski strap when you purchase them. Gear you probably won’t need: Unless a lot of your travel is going to be downhill on long steeps, avoid gear that is intended specifically for downhill. Traditional downhill (lift-service) alpine skiing gear is useless on the slogs. "Backcountry" alpine gear (AT bindings, NTN bindings, 75mm 3-pin bindings with fixed, non-removable cables, etc.) is intended primarily for climbing up then skiing down. Although you can manage flat terrain with them, they won’t offer you the speed and ease of use on long slogs that Nordic gear provides. If you’re inclined to do a lot of “hike-up, ski down” activity (for example the Moosilauke Carriage Road and the Hale Firewarden’s Trail) these are probably the kind of setups you’ll want to look at. But that kind backcountry skiing takes skill and practice and is beyond the scope of this article. Another type of ski that probably won’t net you much in the way of energy savings on the slogs are short, “hybrid” skis" (ex. Altai Hoks or Black Diamond Glidite) that strap to hiking boots. These skis can be great fun for narrow and/or steeper downhill terrain, particularly in powdery snow and/or on bushwhacks and narrow, winding paths, and for climbing moderately steep irregular terrain. On the long flats and mild rolling terrain, they will perform more like snowshoes than skis on average (better than snowshoes on moderate downhills).
That’s all folks—this article is intended as a primer; there’s more you can learn about skis and skiing. Hope to see you cheerfully beating the slogs in skis! This article was inspired by a recent conversation on the Random Group of Hikers FB page. |
TOPICS
All
Humor (The Parsnip)
|


 RSS Feed