NORTHEAST MOUNTAIN PEOPLE
  • On Hiking (Home)
    • Southern New England Highest Summits
    • White Mountain Parsnip
  • About
  • Links

Interviews~ Reflections ~ Reviews ~ Reports ~ Advice ~ Humor 


Mount Chocorua: A New England Classic (12/19/2021)

12/19/2021

0 Comments

 
Picture
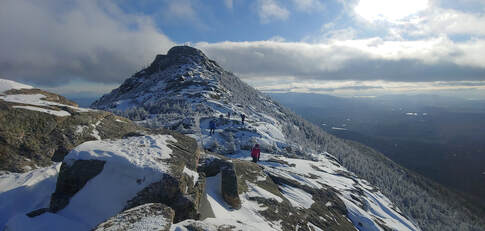
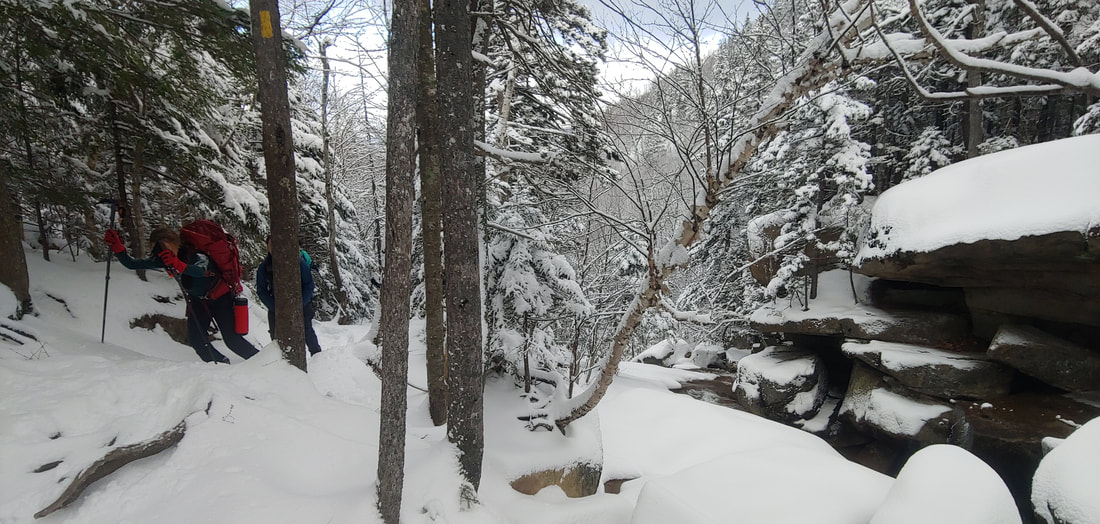
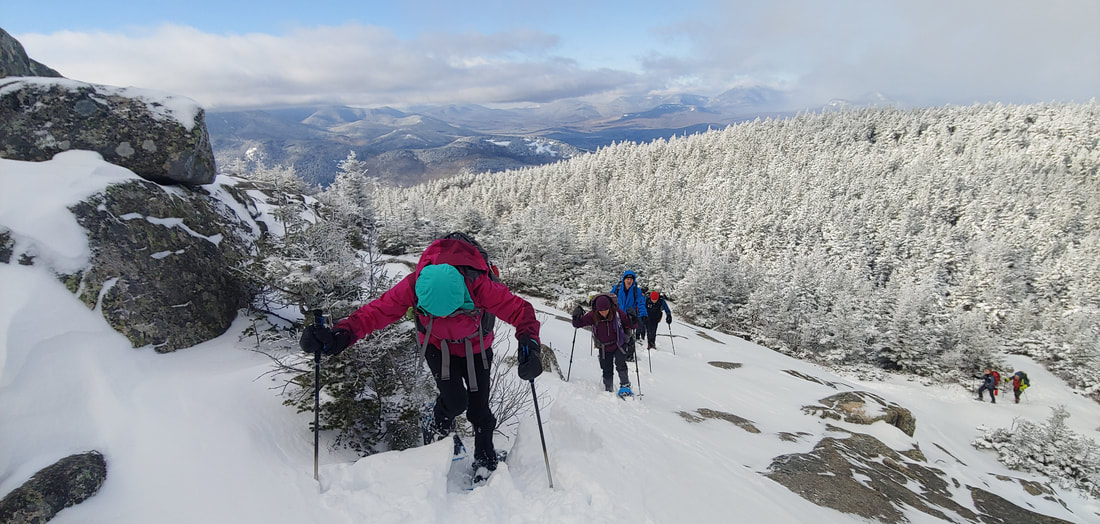
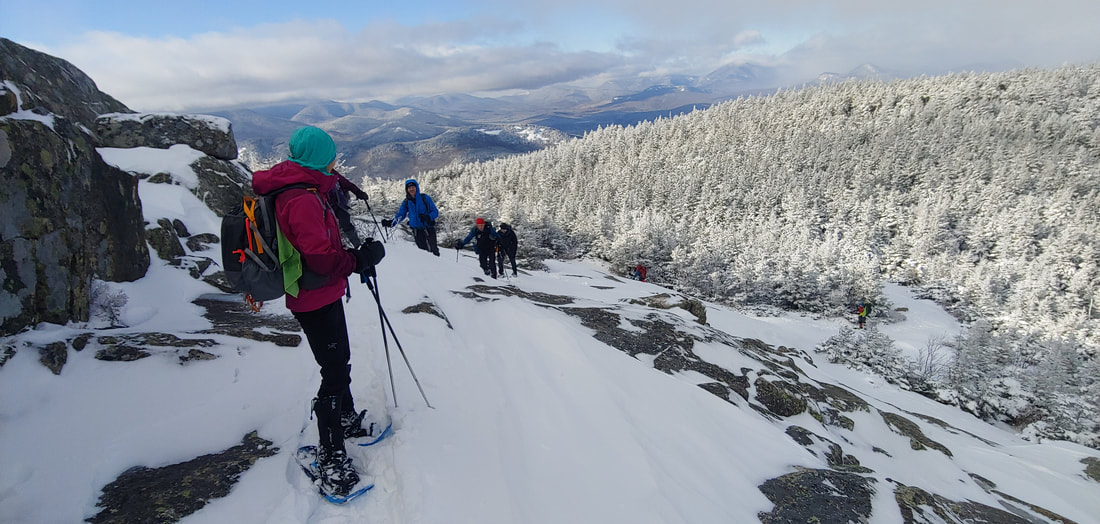
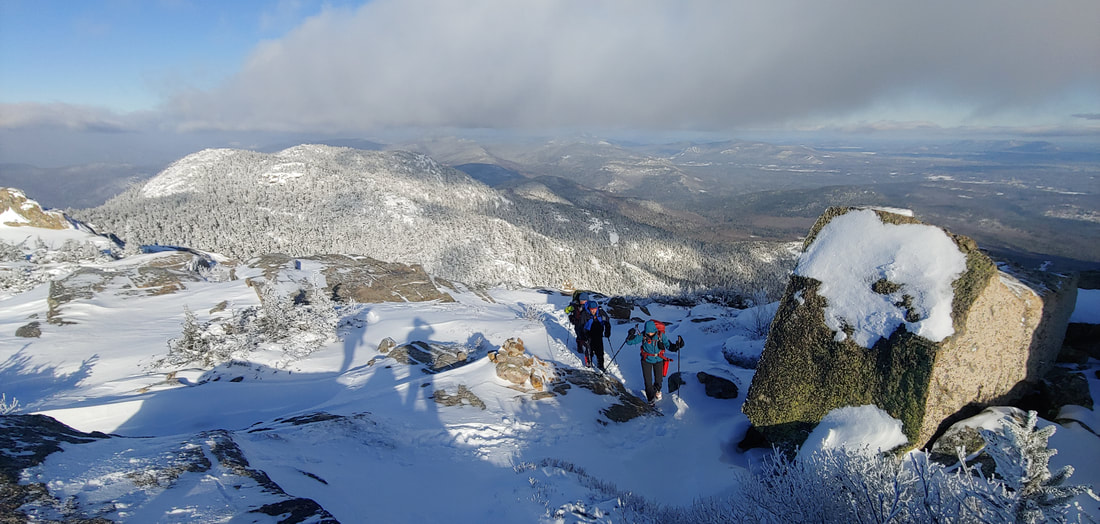
The icy summit cone of Chocorua
When we think of the classic shape of a mountain--all pointy, barren, and snow capped--there are few peaks in the northeast United States that capture that archetype more than New Hampshire's Mount Chocorua  in winter. Chocorua's conical, bald summit (3,490') has been a landmark destination for hikers for over 150 years and figures prominently in the folklore of the White Mountains: the mountain gets its name from the legend of a Native American by the same name who, according to fable, leaped to his death from the summit in culmination of cultural misunderstanding-double revenge- tragedy. 
Chocorua is one of my favorite peaks: delightfully climby and open; challenging but not an overly long hike--and I like to get to it at least once per year if I can. The mountain is also on the 52 With A View hiking list, which includes the finest sub-4K peaks in New Hampshire. A winter-conditions hike up the mountain seemed like a good fit for my hiking club--Random Group of Hikers--which was gearing up for a return after a long Covid-related hiatus, so I put it on the calendar. We had planned to do a loop starting at the popular Piper Trail from the south, but concerns about post-snowstorm parking area plowing at Piper caused me to change the approach to an OAB via the White Mountain National Forest's Champney Falls Trail from the north (7.6mi RT). The falls, which drop off a ledge into the side of a short slot canyon--are some of the most unique and impressive in the state. 
Picture
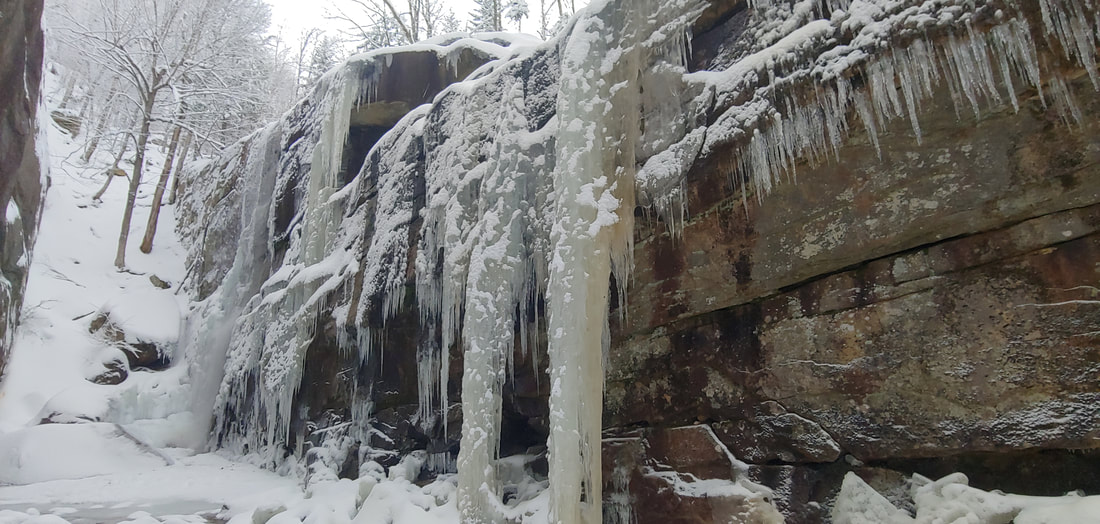
Impressive and unique Champney Falls enroute to Chocorua
We got 5 inches of snow overnight, on top of a layer of black ice: snowshoes were on the menu for the ascent and light traction for descent, but crampons would not have been out of order on the summit cone of the mountain where a few ice bulges made for tricky scrambles. The falls were partially frozen and the four brook crossings unfrozen but manageable on stepping stones. Views from the top were glorious. --Paul-William

0 Comments

WHAT ARE THESE THINGS WE CALL "MOUNTAINS"?

12/11/2021

0 Comments

 
Picture
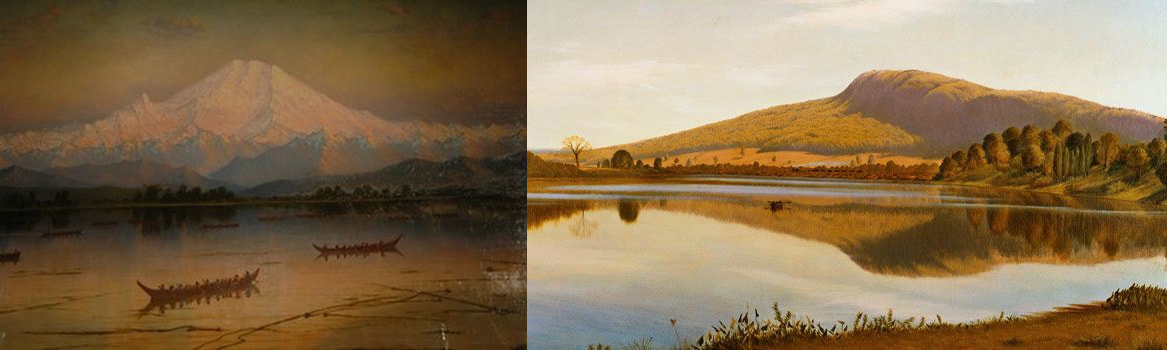
14,411-foot Mt. Ranier (WA) and 935-foot Mt. Holyoke (MA): James Edward Stuart (1885), Thomas Farrar (1835)
Although we say mountains belong to the country, actually, they belong to those that love them— Dōgen. ​
​Hikers from “out west” who visit New England will often scoff at what we call mountains here. It’s an understandable presumption—after all, our highest peak (Mt. Washington) tops out at 6,288 feet—a mere foothill when compared to the Cascade Range of the Pacific Northwest, with its many peaks above 9,000 feet, culminating in 14,411-foot glacier-bound Mt. Rainier. But that arrogance can easily be dispelled with a hike up our Mt. Washington in wintertime—where the meteorological brutality frequently matches that of the Himalaya, the Antarctic, or a Category 5 hurricane. A good winter ass-whipping and turn-around at the measly treeline of 4,500 feet can’t help but make a person wonder exactly what qualities are prerequisite to the term mountain.  
Picture
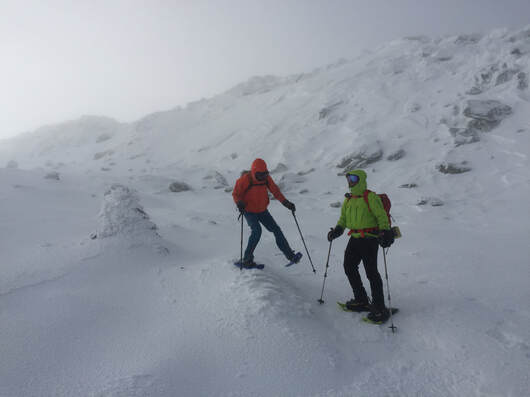
Hikers struggle to stand in wind on the slopes of Mt. Washington in winter. We turned around here, about 1 mile from the summit.
​In the northeast United States, the term mountain is applied quite liberally without much consideration to elevation. So, for instance, in the lower Connecticut River Valley of New England, in the Metacomet Ridge landform (a layer of volcanic strata tilted upward to form a line of cliffs extending from Long Island Sound to Greenfield, Massachusetts) there are many named “mountains.” The highest “peak” in the range is 1,202-foot Mt. Tom in Holyoke, Massachusetts; the lowest, Saltonstall Mountain in Branford, Connecticut, is only 320 feet high. But the Ridge and its peaks exist in stark contrast to the relatively flat valley of the Connecticut River (>60 feet above sea level in MA, lower in CT). The sharp and imposing cliff faces of the Ridge, up to 100 feet high, are a formidable visual and physical mountainous barrier. On the Metacomet Ridge there are also plenty of peaks called hill that are equally rugged but higher and more imposing than Saltonstall Mountain. Connecticut’s Hanging Hills for instance (high point 1,024’) —to further confound consistency-- contain two prominences called “peaks” and two more called “mountain.” The Hills present a massive, cliffy wall when viewed from the city of Meriden. 
Picture
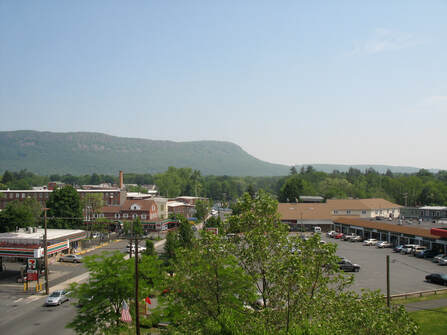
The imposing cliffs of the Metacomet Ridge on Mt. Tom loom over Easthampton, MA (Photo: Sash Kopf)
​By way of contrast, Maine’s Sugarloaf Mountain, third highest landform in the state, is 4,237 feet high—but its immediate neighbor to the northeast, Burnt Hill, 3,609 feet high, is no less rugged. The fact that Burnt Hill exists in the shadow of higher Sugarloaf might have earned it the moniker hill, but it’s no different than hundreds of other even shorter landforms called mountain in Maine. The Camden Hills of coastal Maine, for instance contain six prominences called “mountain” with the highest (Mt. Megunticook) barely exceeding 1,300 feet. All of them are rocky, rugged, and rise imposingly out of the Gulf of Maine. 
Picture
From Mt. Megunticook, overlooking the Gulf of Maine
The famed mountains of Acadia National Park in Downeast Maine reach only as high as 1,527 feet (on Cadillac Mountain) but when viewed from a ship or nearby island, rise out of the sea so impressively they seem like the Himalaya. And yet early European explorers of New England routinely called the much higher White Mountains of New Hampshire, the White Hills. 
​

Distilling from the above, one could say that perspective and topographic contrast might be two relative prerequisites for calling something a mountain, while elevation itself is mostly meaningless. The whole tally of mountain-prerequisites might include:
  • A mountain is composed of bedrock, not sediment;
  • A mountain has some ruggedness and steepness to it;
  • A mountain exists in obvious topographic contrast to the surrounding landscape;  
  • A mountain is a natural landscape feature, not a man-made feature.
But since these same characteristics can be applied to many things called “hill” in New England, along with sea cliffs and forested ledges—we must have a better explanation for the term mountain.​
Picture
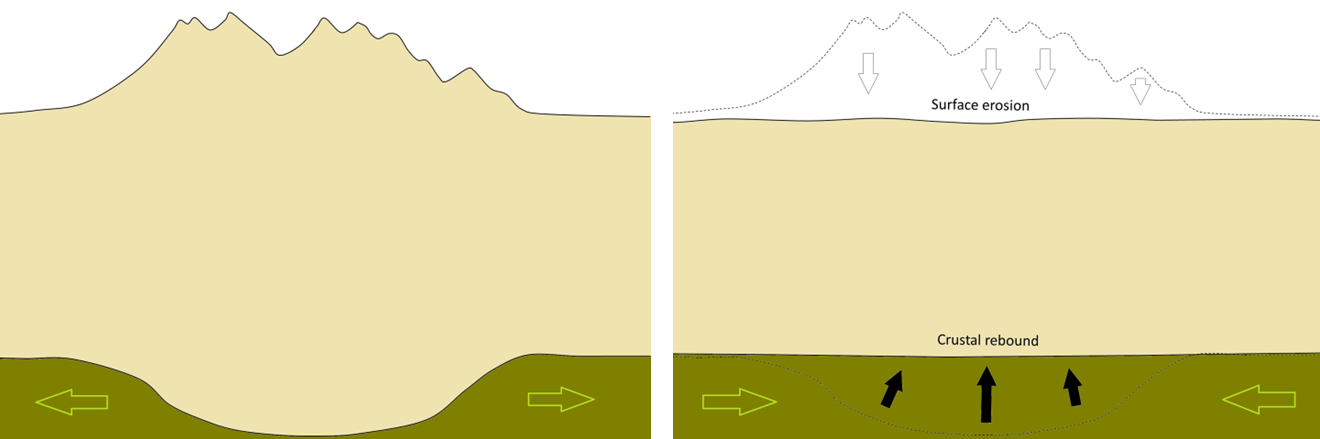
Istostacy (Source: Karla Panchuk (2018) CC BY 4.0, modified after Steven Earle (2016) CC BY 4.0)
​What about earth science? To geologists, mountain and hill aren't scientific terms. Mountains and hills are elevated landforms, and elevated landforms arise from a wide variety of geologic forces. Volcanoes and continental collisions are obvious causes, but erosion and isostacy (land rising or sinking by way of weight and pressure differences in the earth’s crust and mantle) are also responsible. Erosion can create “mountains” by gouging out a flat plateau (the origin of the Catskill Mountains); isostacy in cooperation with erosion can raise “mountains” like magic from a pancake-flat plain. For instance, the Appalachian Mountains were ground down to sea level more than once, then rose up again—go back 100 million years and the location on the continental plate where Mt. Washington now exits was the floor of a valley, and the location of Pinkham Notch was a hill above it. To a geologist, what laypeople call mountain is just another chunk of crustal rock subjected to the contortions and abrasions of our planet Earth. 
Picture
Japanese painting of mountains, 1760
​If science is no help, what about language? The Merriam Webster Dictionary defines mountain as “a landmass that projects conspicuously above its surroundings and is higher than a hill.” For contrast (and with a bit of circular logic), it defines hill as “a usually rounded natural elevation of land lower than a mountain.” Similarly, the Cambridge Dictionary defines mountain as “a raised part of the earth's surface, much larger than a hill, the top of which might be covered in snow” and hill as “an area of land that is higher than the surrounding land.” So, per dictionary, the only real difference between a hill and a mountain is a matter of elevation contrast: a mountain offers a lot of topographic contrast, a hill not so much. 
​The word mountain is itself derived from the Old French montaigne, which is in turn derived from the Latin word mons, which essentially meant the same thing to the Romans as mountain means to us—including all the ambiguity. But, interestingly, mons is derived from the Proto-Indo-European “mnā-” which means “to think.” The evolution of language is based on such extrapolations: new things and concepts that are intuitively relatable to the familiar start out with hand-me-down names. We continue to do this today: for instance root is the subterranean part of the plant from which the rest of the plant seems to arise; we use that same word to associate conceptual origins: the root of all evil, the root of the matter. We haven’t yet evolved a new word for this nuanced construction in English. Maybe it was the same for the linguistic root mnā- as it related to mountains.  
Picture
Buddhist monastery on mountainside in Tibet (Photo: Douglas J. McLaughlin; link in image)
As the ancient ancestors of human beings evolved, they moved from the trees, to the forest floor, to the plains, and, last of all, to the mountains (and the sea). The mountains and the sea were the last external frontiers of humanity, two great forces of nature that were inarguably much larger than us, frightening abodes of gods, devils, and elemental forces that could not be tamed. ​The mind has always been the last internal frontier. One can look at mountains from afar but to actually go into the mountains requires some courage and some tolerance of risk and the unknown, a willingness to expand one’s consciousness through uncertainty and danger. To risk not-being. To think is likewise a practice and expansion of stark contrast and risk; from the plain of unthinking (the animal mind) rise thoughts which challenge an existence based on simple urges. Thoughts are potentially as dangerous as they are rewarding; they are massive and contrasting when compared to thoughtlessness and instinct; they potentially have no end, and what ends they have are only available to the curious and risk-taking. 

And I say, there you have it. There is something conceptually human in the term mountain. To think is to imagine and by imagination conceive ideas; mountains, with all their topographic challenges, inaccessible crags and impassible cliffs, secret valleys and snowy tops, are rightfully objects of our imagination more than they are simple landforms defined by mere elevation. Our mythology and history contain innumerable instances of people going to the mountains to find the divine, themselves, peace, harmony with internal and external nature, freedom, and challenge: all endeavors which involve the use, expansion, ingenuity, or wise management of the human mind. Maybe it is that challenge, an essential part of being human, which stands at the core of the term mountain.
​--Paul-William
Picture

0 Comments

WINTER (hiking) IS COMING! Are you ready?

11/26/2021

1 Comment

 
Picture
Although it isn't officially winter until December 21 (winter solstice), the weather gods don't care--they'll gleefully dump snow and freezing temperatures on us any day now (and have already got started in the mountains). Being prepared for safe winter hiking in the mountains of the northeast United States means having winter-worthy gear and a matching attitude. If you're contemplating winter hiking in the mountains for the first time in your life, unless you're a witless person you're probably at least a little anxious about preparation. But even experience doesn't always translate into preparedness: there's a little corner of hell reserved for us old timers called complacency. Whether new and anxious or old and careless, I hope you'll find this bulleted list helpful in your prep for the snow, ice and negative digits. 

Gear inventory and prep:
  • Base layers: Check winter clothing base layers (underwear, shirts, pants, fleece jackets and vests) for wear and tear. Pay attention to belt draw strings and cord-locks, zippers, stretchy cuffs and waist bands, and seams. Does everything still fit well? Is anything broken or worn? 
Picture
The waterproof/breathable layer has delaminated on the hood of this Marmot shell jacket, making it unreliable.
  • ​​​Shell layers: jackets, pants, gaiters, and outer mittens: Check both the inside and outside of the shell items for signs of wear, along with velcro, cord locks, drawstrings, and zippers. If you find that the breathable layer inside the shell is starting to delaminate from the outer layer, your shell is toast: time to buy a new one. But loss of waterproofing might be less noticeable, and waterproofing can become compromised (but not necessarily ruined) by dirt. Check out these instructions for cleaning and re-waterproofing your shell. Once you've done what you can do, it's time to test your shell. Put it on and get in a cold shower for about ten minutes, turning around a few times to get the water on all parts of the layer but not down the cuffs or into the hood. Hop out of the shower, dab off the outer water with a towel, and pull the shell inside-out to look for leakage. Don't be surprised if your shell is worn out--even the best quality shell jacket will retain good waterproofing and optimum breathability not much longer than a couple years of heavy use (less if abused). Mittens and pants, which typically see less intensive use, may last longer. 
  • Puffy jackets and vests: Check for tears in the fabric where down may be escaping. Rips can be repaired temporarily with duct tape but should be patched or pinched and sewn shut. Check for warmth: down and synthetic fibers will become degraded and compressed over time, reducing insulation value. If your jacket feels less warm to you this winter, it might be the jacket, not your metabolism. 
Picture
Pinched and sewn hole in a Columbia puffy down jacket. Some down was caught in the stitch.
  • Socks, mittens, hats, gaiters, buffs, and gloves: Check these items for thinning, rips, and wear holes. Thinning sock fabric will reduce insulation value and may cause other problems like blisters and inner boot fabric wear. 
  • Boots: Check boot seams and soles for delamination. Check the inside from toe to heel to see if the fabric it's worn through to the insulation layer. Make sure boot inserts are in good shape and not mildewy or worn through. Check the boot tread for excessive wear ("baloney skins"). Clean the boots (wash in cold water and dry thoroughly) and give them whatever annual waterproofing treatment the manufacturer calls for. Patch small tears and small delaminations with Shoe Goo or similar flexible and waterproof adhesive product, let dry for a day, then put the boots on and walk around to see if the repairs hold. To check for waterproofing, put the boots in a dishpan or sink and fill it up to a few centimeters below the upper end of the waterproof outer. Let stand for ten minutes, put the boots on without socks, and see how damp they are. Finally, walk around with them to see if they still fit you well. 
  • Goggles: Check straps, strap hardware, casing, and seams for wear and cracks; check optics for scratching which can reduce optical quality and increase fogging. 
  • Traction and axes: Check points for dullness. Check straps and stretchy webbing for cracks and rips; check chains for weak or broken links. Spikes can easily be sharpened with a tabletop grinder or more tediously with a file; or you can farm out the task to any shop that sharpens knives or landscaping equipment (note that each sharpening will reduce the length of the spikes, making them a little less effective each time. (Traction gear with longer spikes, like Hillsound Trail Crampons, will endure more trips to the sharpener than short spike brands like Microspikes). If you have adjustable crampons, be sure to check the adjustment pins and make sure they are pre-set to the length of your winter boots. Check ax hardware and tips for loose hardware connections. Sharpen the pick as necessary.  
Picture
No bueno: broken chain link and dull points on these Microspikes.
  • ​Snowshoes: Check all parts of the snowshoe for tears, rips, cracks, broken fasteners, and other signs of entropy. Strap them to your boots and walk around in soft turf or sand for a few minutes to see if they are working well. Check traction points and sharpen as necessary. Spray hinges with teflon dry lube spray. Most snowshoes can't easily be repaired at home--if you have problems, you may have to send them back to the manufacturer to fix (TSL brands snowshoes can be easily repaired at home with ordered replacement parts, including new crampon points). If you need to send away for repairs, be prepared to rent, borrow, or buy a replacement while you wait (it's always wise to check snowshoes in the spring and deal with repairs over the summer). 
  • Skis: Check skis and bindings for signs of wear, paying close attention to all surfaces including edges. Bring skis to a pro shop for proper  tuning and treatment. As a rule of thumb, skis should be tuned about once every 20 full days of use, but that's a rough average that doesn't take into account a lot of variables. If you used your skis a lot the prior winter without tuning, it's probably wise to bring them to the shop for a look over.
  • Poles: Check ski and trekking pole baskets, tips, shafts, segment binding fittings and/or cords, and wrist straps for wear and cracks. Use a piece of coarse wool or (lightly) a plastic scrubbie to clean oxidized debris and dirt from pole segments, then use a dry-drying Teflon-based lubricant spray to keep them sliding smoothly. Test poles: walk around with them a bit, adjust the length of adjustable poles and collapse them, and put a little pressure on the poles to see if the adjustments hold. Tighten any loose segment adjustments. Look down the length of the poles to check for warping. Warped poles are more likely to break and can't easily be straightened without making them worse--replace any warped poles or pole segments. Broken ski baskets and worn tips can be tricky to replace at home--bring to a ski pro shop for care. 
Picture
Removing chemical oxidization from this collapsible ski pole. with a plastic scrubbie.
  • Backpack: Check all parts of the backpack for wear. Pay special attention to buckles, straps, bottom panel, zippers, side pockets, and frame stays. Place a kitchen trash bag in the bottom of your pack and leave it there as an emergency inner waterproof layer for damp days. It's cheaper and more effective than a pack cover. 
  • Water bottles: check for cracking and leakage. 
  • Headlamps: Remove old batteries and replace with new lithium batteries (lithium performs better in cold temperatures). Check the brightness, straps, and casing, and refamiliarize yourself with the lamp settings. Make sure you have spare, fresh batteries in your long-day or overnight kit. Dispose of any batteries you are not sure of. 
Picture
Replace old headlamp batteries with new lithium batteries (which hold up better in cold temperatures).
  • Emergency kit/items: Check your first aid kit for adequate stock, and item wear and tear. Replace items as needed. Consider adding in a small vial of sunscreen for snow-glare, some electrolyte tablets or goo, some hand and/or foot warmers, and some moleskin for those feet that haven't worn winter boots in months. Replace any expired warmers with new ones (some warmers will expire before their expiration date--if a warmer feels grainy or hard to the touch or has had its wrapper breached, it's expired). Unroll and check emergency bivy bags and space blankets for wear and mildew. Mildew compromises waterproofing--if you have it, it's probably time for a new bivy (I always dry out my emergency bivy after each hike, even if I don't use it). Clean and check multi-tools and swiss army knives. Sharpen dull knife blades. Check your compass for cracks and dial readability. Check your emergency contacts & I.D. card for current information. 
Picture
Although these warmers will expire next year, I check them by feeling them through the plastic wrapper: if they feel grainy, they're no longer good.
  • Overnight (or emergency overnight) gear: Check sleeping bags for rips and patch or sew shut. Check for warmth by laying in the bag for an hour on a very cold night outside your house with a known temperature outside: if the sleeping bag no longer lives up to its cold rating, consider replacing it and/or downgrading it to a three season bag. A failing bag can be augmented with a emergency bivy or bag liner, but that increases the total weight of the warmth. Check all stoves for proper functioning: place stove and fuel in your freezer for a few hours before testing. Make sure fuel cannisters aren't low or depleted. If you use liquid fuel, use fresh fuel, not aged fuel, for winter trips. Check fire starting tools (matches, lighter, etc) to make sure they are adequate and functional. Seam-seal tents and check for rips and failing hardware. To check for waterproofing, set up and leave in your yard on a rainy day, then check for leaks. 
  • Electronic devices: Check your phone battery by putting the phone in your freezer for about 20 minutes to see if it crashes. Some phone models will mistakenly read cold temperatures as low battery level and will spontaneously shut down. If your device does this, consider getting a new battery or new phone, or else take extra precautions in keeping your phone warm while you hike. Check external backup phone batteries to be sure they hold a charge. Make sure any critical GPS apps on your phone are up-to-date and pre-loaded with the areas you intend to hike in (see my article on this subject). Dedicated GPS devices, location beacons, and cameras: check device function and subscriptions, replace worn batteries. Watches: replace batteries at the start of each winter season. 
  • Maps: Make sure your maps are in good shape and are still legible.
Picture
Cheapskate that I am, when this synthetic map started to rip a the seams, I sewed it back together with my sewing machine. But maybe it's time to replace it?
  • ​Club memberships, parking permits, "Hike Safe" Card, etc.: If you use these where you hike, be sure your subscription is up to date. 
  • Your ride: As I frequently remind people, statistically speaking you're more likely to die in a car accident on the way to a hike than you are to die while hiking. With that in mind, make sure your car has a good set of snow tires, and is otherwise winter-worthy and road worthy. Winter is not a time to be messing around with a worn out battery, failed heater, worn wiper blades, empty wiper fluid basin, worn brake shoes, or thin tire treads, especially if you're driving a bit to get to trailheads. I like to carry a collapsible snow shovel (a short-handled metal square shovel may be an ever better tool) in the back of my car for winter, and I always carry jumper cables, window scraper, a reflective break-down placard, a spare tire, a big can of Fix-A-Flat, a good car jack, a tow strap, a tire plug kit, and a tire pressure gauge. Some people like to also carry traction devices to help them get unstuck at snowy trailheads and on back roads.  
Picture
I keep this folding shovel in my car just in case I get snowed in at a trailhead.
​Mental and physical preparedness: 
  • Research: If you have specific winter hiking goals, research your trips in advance, paying attention to routes, potential bail-out/ escape routes, and typical trailhead parking and trail winter conditions on your route. Most trail conditions report websites allow you to look back in time and read last winter's reports. 
  • Backup bag: Consider keeping a few key spare items in a duffle bag in the trunk or back of your car, in case you (or a friend) forget to bring them. I keep extra lithium batteries and handwarmers, a single set of base layer clothing, socks, hat, gloves, buff, mittens, a few energy bars, empty spare water bottle, a couple spare maps covering areas I frequently hike in, and a simple gear repair kit with cord, straps, duct-tape, gear-ties, and needle & thread. I also use my car to store my light traction and snowshoes, so that I never forget them (but I bring my poles in to dry so that the adjustable sections will not freeze up).
  • Your body: Once you have your gear in order and have done your preparation, it's time to do 2-4 late fall, moderate shake-out hikes on familiar and less risky terrain during winter conditions (snow, cold temps). Bring your full complement of gear, even if you don't need it all, to help your muscles and cardio system get used to carrying the extra winter gear weight. Assess your conditioning on these hikes and use it as a baseline to determine the difference between what you're ready for now, and what you need to work up to. Pay attention to any signs your body is giving you that may suggest medical issues that need assessment or attention. ​ ​
Picture
A lot of preparation went into planning the non-traditional route for this successful 2016 hike up East Kennebago during a blizzard.
  • Get in the habit of periodically checking your gear over course of the winter season as described above, to reduce unwelcome surprises in the middle of nowhere. Sometimes even a small gear failure on a winter hike can set into motion a series of unfortunate events. Preparedness takes the edge off those odds. 
Safe winter hiking to you all!--Paul-William

1 Comment

Review: Steve Smith's The Waterville Valley Guidebook

11/21/2021

0 Comments

 
If you've done a bit of hiking in New Hampshire, you probably know of Steve Smith and have benefited from his writing and hiking experience. Ensconsed in his unassuming little hiking-lit bookstore in Lincoln, New Hampshire like a wayside monk (and with an attitude to match), Smith has researched, edited, co-edited, co-wrote, and wrote some of the best-known hiking titles in the state: The AMC White Mountain Guide, AMC Southern New Hampshire Guide (with Ken MacGray in the latest edition), and ​the equivalent 
Picture
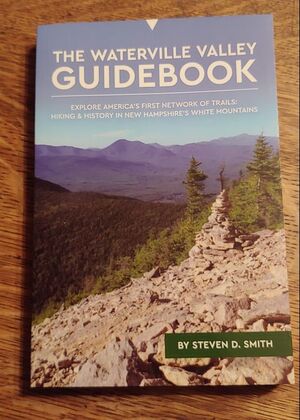
of a peakbagger's bible: The 4000-Footers of White Mountains. Well, Steve has a new book out (as of 2020), this one a treatise on all the trails, mountains, and historic features of the Waterville Valley region of the White Mountains: The Waterville Valley Guidebook (332 pages/ $25). Like The 4,000-Footers, the book is meticulously researched, with tidbits about the history of the area and its hiking and ski trails, local nomenclature, settlement, geology, ecology and all sorts of other fun facts (the scope of the book includes everything from village paths to rugged trails on the nearby high peaks of Osceola, Tecumseh, and the Tripyramids). Unlike The 4,000-Footers, The Waterville Valley Guidebook is loaded with color glossy photographs, some of them current, some some historic. The tone of the book is objective and informative but accessible and laid back. Both an incredibly detailed and entertaining hiking guidebook and a handsome coffee table book, it's the kind of book you'll want to pick up and read just for fun on a rainy day or consult briefly before setting out for an adventure on a sunny day. 
--Paul-William

0 Comments
<<Previous
Forward>>

    TOPICS

    All
    Advice
    Gear
    Great Small Peaks
    Hazards
    Hikes To Try
    Mountain People
    Nature
    Philosophy
    Trip Reports

    Humor (The Parsnip)

    RSS Feed

    Picture
    Visit Our Facebook Page


    Picture
Proudly powered by Weebly
  • On Hiking (Home)
    • Southern New England Highest Summits
    • White Mountain Parsnip
  • About
  • Links